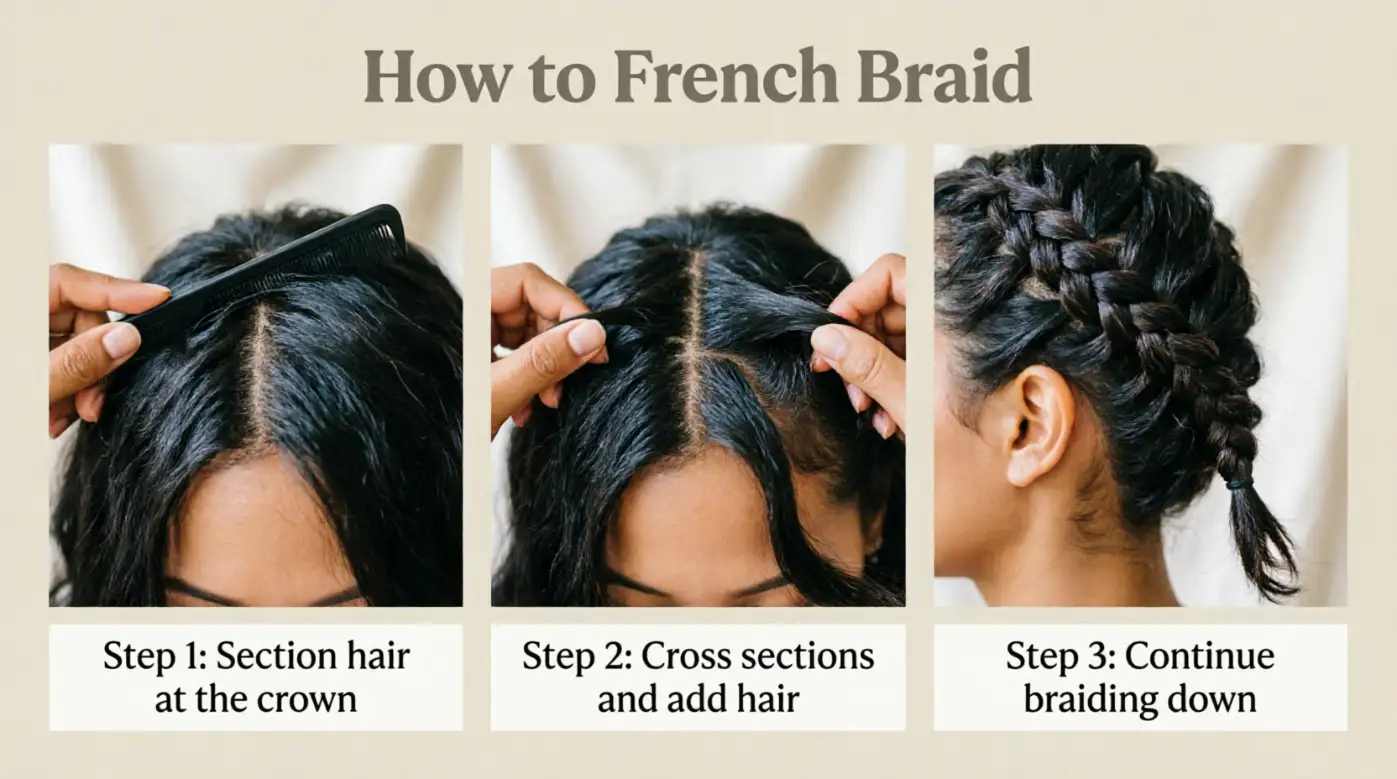
To French braid your hair, divide a small section at the crown into three equal strands. Cross the right strand over the middle, then cross the left strand over the new middle. Add a small section of loose hair to each outer strand before crossing it over the middle. Repeat until you reach your neck, then finish with a regular braid and secure it with a hair tie.
Key Takeaways
- A French braid starts with three sections of hair and gradually incorporates more hair as you braid.
- Brush your hair first to remove tangles and make braiding easier.
- Keep the strands close to your head and use even tension for a neat result.
- Practice the basic crossover technique before attempting to braid your own hair.
- Use a hair elastic and gently loosen the finished braid for a fuller appearance.
What Is a French Braid?
A French braid is a classic hairstyle made by weaving three strands of hair together while gradually adding more hair from both sides of the head. Unlike a regular three-strand braid, it starts near the crown and incorporates loose hair as you work toward the neck.
This technique creates a braid that sits close to your scalp and keeps your hair neatly in place. You can wear it for everyday activities, workouts, school, work, or special occasions.
French braids work on many hair types and lengths, although shorter hair and layers can require extra care. Once you understand the basic technique, you can also experiment with side French braids, double French braids, and other styles.
What You Need to French Braid Your Hair
You don’t need professional hairstyling tools to create a French braid. A few simple items can make the process easier, especially if you’re a beginner.
- Hairbrush or detangling comb: Removes knots and makes the strands easier to manage.
- Hair elastic: Keeps the finished braid secure.
- Sectioning comb: Helps you create clean, even sections.
- Bobby pins: Hold short layers and loose strands in place.
- Texturizing spray: Adds grip if your hair is very smooth or slippery.
You can also use a mirror to check your progress, especially when learning to braid your own hair. However, the most important things are your hands, patience, and practice.
How to French Braid Step by Step
Follow these seven simple steps to create a traditional French braid. If you’re a beginner, practice on someone else’s hair or a mannequin before trying it on yourself.
Step 1: Brush and Prepare Your Hair
Start by brushing your hair thoroughly to remove knots and tangles. Smooth hair is easier to divide into sections and helps prevent strands from getting caught while braiding.
If your hair is freshly washed and slippery, a little texturizing spray may help you get a better grip. You don’t need to wash your hair immediately before braiding.
Make sure your hair is completely detangled before moving to the next step.
Step 2: Separate Your Hair Into Three Sections
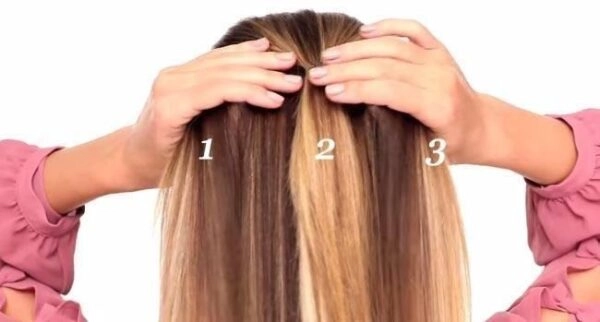
Take a section of hair from the top of your head, near your hairline or crown. Divide it into three roughly equal strands.
Hold one strand in your left hand, one in your right hand, and keep the middle strand between them.
Try to keep the three sections separate. This is important because mixing them together can make the braid uneven.
Step 3: Make the First Crossovers
Start braiding just as you would with a regular three-strand braid.
- Take the right strand and cross it over the middle strand.
- The original right strand is now in the middle.
- Take the left strand and cross it over the new middle strand.
You should now have the beginning of a regular braid near the top of your head.
Keep your hands close to your scalp so the braid stays in place. Avoid pulling too tightly, as excessive tension can make the hairstyle uncomfortable.
Step 4: Add Hair From Both Sides
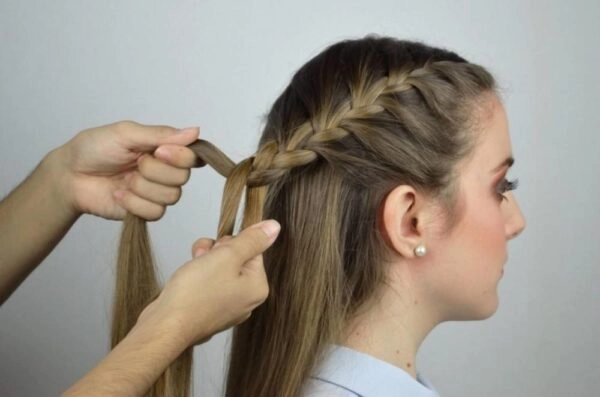
This is the most important step in learning how to French braid.
Before crossing an outer strand over the middle, pick up a small section of loose hair from the same side of your head. Combine it with that outer strand.
Follow this pattern:
- Pick up a small section of loose hair from the right side.
- Add it to the right strand and cross the combined strand over the middle.
- Pick up a small section of loose hair from the left side.
- Add it to the left strand and cross it over the new middle.
Keep the added sections approximately the same size. This helps create a balanced braid.
Step 5: Continue Braiding Down Your Head
Repeat the process, alternating between the right and left sides. Each time you cross an outer strand over the middle, add a little more loose hair from that side.
Keep your hands close to your scalp and maintain gentle, even tension.
Continue until you’ve incorporated all the loose hair from the sides of your head. You should reach the nape of your neck, where the braid transitions into a regular braid.
Step 6: Finish With a Regular Braid
Once you’ve reached the nape of your neck and have no more loose hair to add, continue braiding the remaining length normally.
Cross the right strand over the middle, followed by the left strand over the new middle. Repeat until you reach the ends of your hair.
Try to keep the same tension throughout the braid so it looks consistent from top to bottom.
Step 7: Secure Your Braid
When you reach the ends, secure your braid with a hair elastic.
Check the braid in a mirror to see if any sections are loose or uneven. If you want a fuller, more relaxed appearance, gently pull the outer edges of the braid to widen it.
You can also use a few bobby pins to secure short strands that don’t stay in place.
How to French Braid Your Own Hair
French braiding your own hair can be more challenging because you can’t easily see the back of your head. However, the technique is the same as braiding someone else’s hair.
Here are some helpful tips:
- Use two mirrors: Place one behind you so you can check the back of your head.
- Start with a small section: A smaller starting section can make it easier to control your strands.
- Keep your elbows comfortable: Take short breaks if your arms become tired.
- Practice by touch: Learn to identify the three strands with your fingers instead of constantly looking in the mirror.
- Work slowly: Focus on adding one small section at a time rather than trying to braid quickly.
If you’re struggling, practice the basic crossover motion first. Once you can do it without looking, adding hair becomes much easier.
Tips for a Neat French Braid
A few simple techniques can make your French braid look smoother and more balanced.
- Use equal sections: Pick up similar amounts of hair from each side to create a consistent pattern.
- Maintain steady tension: Keep the braid secure without pulling so tightly that it hurts.
- Keep your hands close to your head: This helps prevent the braid from becoming loose or lifting away from your scalp.
- Smooth each section: Use your fingers or a comb to remove tangles before adding new hair.
- Adjust the finish: Gently pull the edges of the completed braid if you prefer a softer, fuller look.
If you have fine hair, a little texturizing spray may help the braid hold its shape. For a polished look, smooth any flyaways with your fingers.
Common French Braiding Mistakes and How to Fix Them
Even if you’re following the steps correctly, your first few French braids may not look perfect. The following tips can help you correct common problems.
| Common mistake | How to fix it |
| Uneven braid | Pick up similar-sized sections from both sides. |
| Loose braid | Keep your hands close to your scalp and maintain steady tension. |
| Tangled strands | Brush your hair thoroughly before starting. |
| Braid looks too thin | Gently widen the finished braid by pulling its edges. |
| Short strands keep falling out | Secure them with small bobby pins. |
| Braid pulls or feels painful | Loosen your grip and avoid pulling tightly. |
The most important thing is to keep practicing. You may need several attempts to develop a comfortable grip and consistent technique.
French Braid vs. Dutch Braid
French and Dutch braids use a similar three-strand technique, but they create different appearances.
| Feature | French braid | Dutch braid |
| Technique | Cross outer strands over the middle | Cross outer strands under the middle |
| Appearance | Lies flatter against the head | Stands out from the head |
| Style | Classic and smooth | Raised and more defined |
| Best for | Traditional, sleek hairstyles | Prominent, textured hairstyles |
Both styles involve adding loose hair as you braid. The main difference is if you cross the strands over or under the middle.
If you can French braid, learning the Dutch braid is a natural next step.
Frequently Asked Questions
Is French braiding easy for beginners?
French braiding can feel difficult at first because you need to hold three strands while adding more hair. However, beginners can learn it by practicing the basic crossover technique and working slowly. Start with someone else’s hair if possible, then try braiding your own once you’re comfortable.
How long does it take to French braid your hair?
The time depends on your hair length, thickness, and experience. A beginner may need 10–20 minutes or longer, while someone experienced may finish much faster. Your first few attempts will probably take longer as you learn to control the strands.
Can you French braid short hair?
Yes, you can French braid short hair if there’s enough length to hold and cross the sections. Start with small sections and use bobby pins to secure shorter layers. A half-up French braid can also work when your hair is too short for a full braid.
How do you keep a French braid from falling apart?
Use even sections, maintain gentle tension, and keep your hands close to your scalp. Secure the end with a hair elastic. If your hair is very smooth, texturizing spray may help the braid stay in place.
Can you French braid wet hair?
You can braid damp hair, but avoid pulling tightly, especially when the hair is wet and more prone to stretching and breakage. For a beginner, dry or slightly damp, detangled hair is generally easier to handle.
Conclusion
Learning how to French braid takes patience, but the technique becomes easier with practice. Start with three equal sections, cross the outer strands over the middle, and add small sections of hair from both sides as you work down your head.
Keep your hands close to your scalp, maintain even tension, and secure the finished braid with a hair elastic. Don’t worry if your first attempt looks uneven. With regular practice, you’ll become more comfortable and develop a French braid that suits your style.
I am Toni Morrison an acclaimed American novelist and Nobel Prize winner whose powerful storytelling explored identity, memory, love, heritage, and the human spirit through unforgettable literary works at Spiritualdreamz.com.