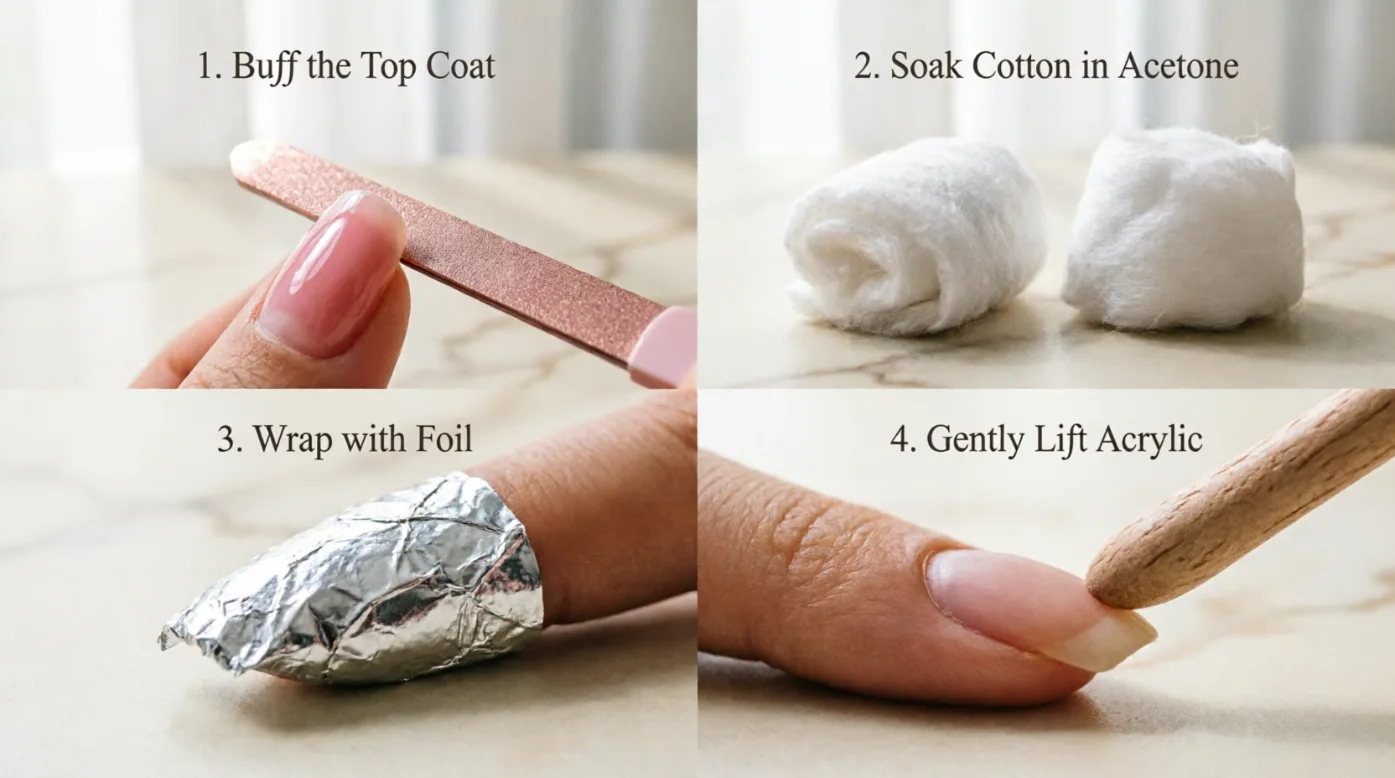
To remove acrylic nails at home, trim the extensions, gently file away the shiny top layer, then soak cotton in 100% acetone and wrap each nail with foil. After about 15–30 minutes, gently remove the softened acrylic. Repeat the soak if needed, rather than peeling, pulling, or scraping the natural nail.
Key Takeaways
- 100% acetone is the most practical at-home method for dissolving acrylic.
- Trim and file the acrylic first to make the soaking process easier.
- Never rip, peel, or force acrylic away from your natural nails.
- If the acrylic remains hard, soak longer instead of scraping harder.
- Use acetone in a well-ventilated area and keep it away from flames and heat because it is highly flammable.
What You Need to Remove Acrylic Nails at Home
Before you start, gather everything so you do not have to stop halfway through the process.
You will need:
- 100% acetone
- Nail clippers
- A coarse or medium nail file
- Cotton balls or cotton pads
- Aluminum foil
- A cuticle pusher or orangewood stick
- Petroleum jelly
- A nail buffer
- Cuticle oil or a rich hand cream
- A towel or disposable work surface
The important ingredient is 100% acetone. Regular nail-polish remover may contain acetone but is often less effective for breaking down a thick acrylic enhancement. Professional and beauty sources commonly recommend pure acetone for the soak-off process.
Set up your workspace somewhere with good ventilation. Acetone evaporates easily, can irritate the skin and eyes, and is a flammable liquid, so keep it away from cigarettes, candles, flames, and hot surfaces.
How to Remove Acrylic Nails at Home Step by Step
1. Trim the Acrylic Nails
Start by cutting the acrylic extensions as short as you comfortably can.
Use nail clippers to remove the extra length that extends beyond your natural nail. Do not try to cut into your natural nail or squeeze the clippers aggressively if the acrylic is extremely thick.
Removing the extra length gives you less acrylic to dissolve and can make the entire process easier.
2. File Off the Shiny Top Layer
Next, use a nail file to gently remove the shiny surface of the acrylic.
You are not trying to file the acrylic completely off. Instead, file enough to break through the polish or topcoat and thin the artificial material.
Work carefully and avoid filing down into your natural nail. The American Academy of Dermatology notes that acrylic application itself can involve filing the natural nail surface, which can make nails thinner and weaker.
A good stopping point is when the surface looks dull rather than glossy.
3. Protect the Surrounding Skin
Apply a thin layer of petroleum jelly around the skin near each nail.
Try to keep most of the petroleum jelly on the surrounding skin rather than coating the acrylic itself. This creates a barrier that can reduce direct contact between acetone and your skin.
Acetone can dry and irritate skin, especially with prolonged contact.
If your skin is already cracked, irritated, or cut around the nails, consider having the acrylics removed professionally instead.
4. Soak Cotton in Acetone and Wrap Your Nails
Cut or tear cotton into pieces that are approximately the size of each nail.
Saturate each piece with 100% acetone and place it directly over the acrylic. Then wrap the fingertip with a small piece of aluminum foil to hold the cotton firmly against the nail.
Work on one hand at a time if that makes the process easier.
The goal is to keep the acetone in contact with the acrylic instead of allowing it to evaporate quickly. The cotton-and-foil method is widely recommended for at-home acrylic removal.
5. Wait for the Acrylic to Soften
Now comes the part that requires the most patience.
Leave the wrapped nails alone for roughly 15–30 minutes, depending on the thickness and type of acrylic. Some sets soften sooner, while thick or stubborn applications can take longer.
Do not rush this step.
After the first soak, remove one foil and check the acrylic. Properly softened acrylic should look noticeably softer and should begin to lift or crumble with gentle pressure.
If it is still hard and firmly attached, do not force it.
Simply reapply fresh acetone-soaked cotton and wrap the nail again for another few minutes.
6. Gently Remove the Softened Acrylic
Once the acrylic has softened, use a cuticle pusher or orangewood stick to gently work away the product.
The key word is gently.
If the acrylic slides or flakes away with light pressure, continue. If you have to push hard, stop and soak the nail again.
Never treat resistance as a signal to scrape harder. Your goal is to remove the artificial product, not layers of your natural nail.
Picking or aggressively filing artificial nail products can contribute to nail damage, which is one reason dermatologists recommend avoiding harsh removal practices.
7. Repeat the Soak if Necessary
It is completely normal for some acrylic to remain after the first soak.
Instead of trying to remove the last stubborn pieces by force, repeat the acetone process.
Apply another acetone-soaked cotton piece, wrap the nail again, and wait until the remaining acrylic becomes soft.
This may take longer with thicker applications.
Patience is safer than trying to finish the job in five minutes.
8. Smooth and Clean Your Natural Nails
After all the acrylic has been removed, wash your hands thoroughly with soap and water.
Look at each natural nail under good lighting. If small amounts of product remain, use a gentle buffer rather than aggressively filing the nail surface.
Do not try to make your natural nails extremely smooth by repeatedly buffing them. Your nails may look thinner or feel more sensitive after acrylic removal.
Finish with cuticle oil and a moisturizer or hand cream to help restore moisture to the surrounding skin.
How Long Does It Take to Remove Acrylic Nails?
Plan for approximately 30–60 minutes from preparation through cleanup.
The actual time depends on the thickness of the acrylic, the products used, how much of the artificial material remains, and how effectively the acetone reaches it.
The soaking stage is usually the slowest part. Trying to make it dramatically faster by peeling, scraping, or aggressively filing can increase the chance of damaging the natural nail.
A slower removal is usually better than a forceful one.
Can You Remove Acrylic Nails Without Acetone?
Yes, there are ways people attempt to remove acrylic without acetone, including prolonged filing or methods involving warm water and oil. However, these approaches are generally slower and may not work well on a firmly attached acrylic set.
Simply peeling or lifting the acrylic is not a safe substitute for soaking. If the enhancement is strongly bonded, forcing it off can take layers of the natural nail with it.
An electric nail file can also remove acrylic, but it requires proper technique. At-home users who are not trained in e-file use can accidentally damage the nail plate by using the wrong bit, pressure, angle, or speed.
If you do not want to use acetone, the safest choice for a strongly bonded set may be professional removal rather than trying to pry it off yourself.
Mistakes to Avoid When Removing Acrylic Nails
Peeling the Acrylic Off
This is one of the biggest mistakes.
Even if an edge has started lifting, pulling the entire enhancement away can remove layers of your natural nail.
Using Excessive Force
If the acrylic will not move, it probably needs more time in acetone.
Do not use a sharp object, knife, metal tool, or other household item to pry underneath it.
Filing All the Way Down to the Natural Nail
Filing is useful for removing the surface and reducing thickness, but the goal is not to grind away every trace of acrylic.
Stop when you reach the natural nail rather than repeatedly filing to make it perfectly smooth.
Using Acetone Near Flames
Acetone is highly flammable. Do not use it near candles, cigarettes, open flames, or hot surfaces. Work in a well-ventilated area and follow the product label for safe handling and storage.
Rushing the Soak
If the acrylic is still hard, more time is usually the answer, not more force.
How to Care for Your Natural Nails After Removal
Your nails may feel thin, dry, or more sensitive immediately after acrylic removal. That does not mean you should immediately cover them with another enhancement.
The American Academy of Dermatology notes that artificial nails can leave natural nails thin, brittle, and dry, and recommends giving nails time without artificial enhancements to reduce damage.
For the next several days:
- Keep your natural nails relatively short.
- Apply cuticle oil regularly.
- Use hand cream or moisturizer after washing your hands.
- Avoid aggressively buffing the nail surface.
- Avoid picking at peeling areas.
- Give damaged or weakened nails a break from new acrylic applications.
If your nails are already brittle, cracked, painful, or visibly damaged, covering them with another artificial nail may hide the problem rather than solve it.
When You Should See a Nail Professional or Dermatologist
Home removal is not appropriate for every situation.
Consider professional removal if the acrylic is extremely thick, firmly bonded, painful, or difficult to remove without force. A nail technician can assess the enhancement and remove it with the appropriate technique.
You should also seek medical advice if you notice significant pain, swelling, bleeding, pus, major nail lifting, or unusual discoloration.
The American Academy of Dermatology recommends having nail changes evaluated rather than assuming every change is simply cosmetic.
If the nail itself has suffered a significant injury, particularly severe pain, substantial bleeding, or major discoloration, medical evaluation may be appropriate.
Frequently Asked Questions
What is the easiest way to remove acrylic nails at home?
The easiest practical method is usually the acetone-soak method. Trim the extensions, file the surface, apply acetone-soaked cotton, wrap the nails with foil, and wait for the acrylic to soften. Then gently remove the softened product and repeat the soak if necessary.
How long should you soak acrylic nails in acetone?
Acrylic nails commonly require around 15–30 minutes of soaking, although thick or stubborn sets can take longer. Check the product after the initial soak and continue soaking if it remains hard. Do not scrape aggressively simply because the first soak did not work.
Can I peel acrylic nails off?
It is best not to. Peeling or forcefully lifting acrylic can remove layers of your natural nail and leave it thin or damaged. If the acrylic does not release easily, soften it further with acetone instead.
Can I remove acrylic nails without acetone?
It is possible, but there is no equally quick and reliable household substitute for acetone. Filing can take a long time, while attempting to pry off firmly attached acrylic can damage the natural nail. For stubborn sets, professional removal is a safer option.
Will acetone damage my natural nails?
Acetone can dry and irritate the surrounding skin, and repeated artificial-nail removal can contribute to nail dryness and weakness. Using it carefully, limiting skin exposure, and avoiding aggressive scraping can reduce unnecessary damage.
What should I do after removing acrylic nails?
Wash your hands, gently smooth any remaining product, and apply cuticle oil and moisturizer. Keep your nails short and avoid immediately filing or buffing them aggressively. If they look thin or damaged, consider giving them a break from artificial enhancements.
Is it better to remove acrylic nails at home or at a salon?
For a normal, healthy set, careful home removal is possible. However, salon removal is preferable when the acrylic is unusually thick, difficult to dissolve, painful, or already causing nail problems. A professional can remove the product without relying on force.
Final Thoughts
Learning how to remove acrylic nails at home is mostly about patience. Trim the excess length, file away the surface coating, protect your surrounding skin, and let acetone gradually soften the acrylic. Most importantly, never pull or pry when the product is still firmly attached.
Your natural nails are the priority. If an acrylic set refuses to come off gently, take that as a reason to soak longer or get professional help, not a reason to use more force.

I am James Patterson an American writer sharing thoughtful insights on dreams, spirituality, personal growth, and everyday life through practical guides and meaningful stories for SpiritualDreamz.com readers everywhere with warmth.