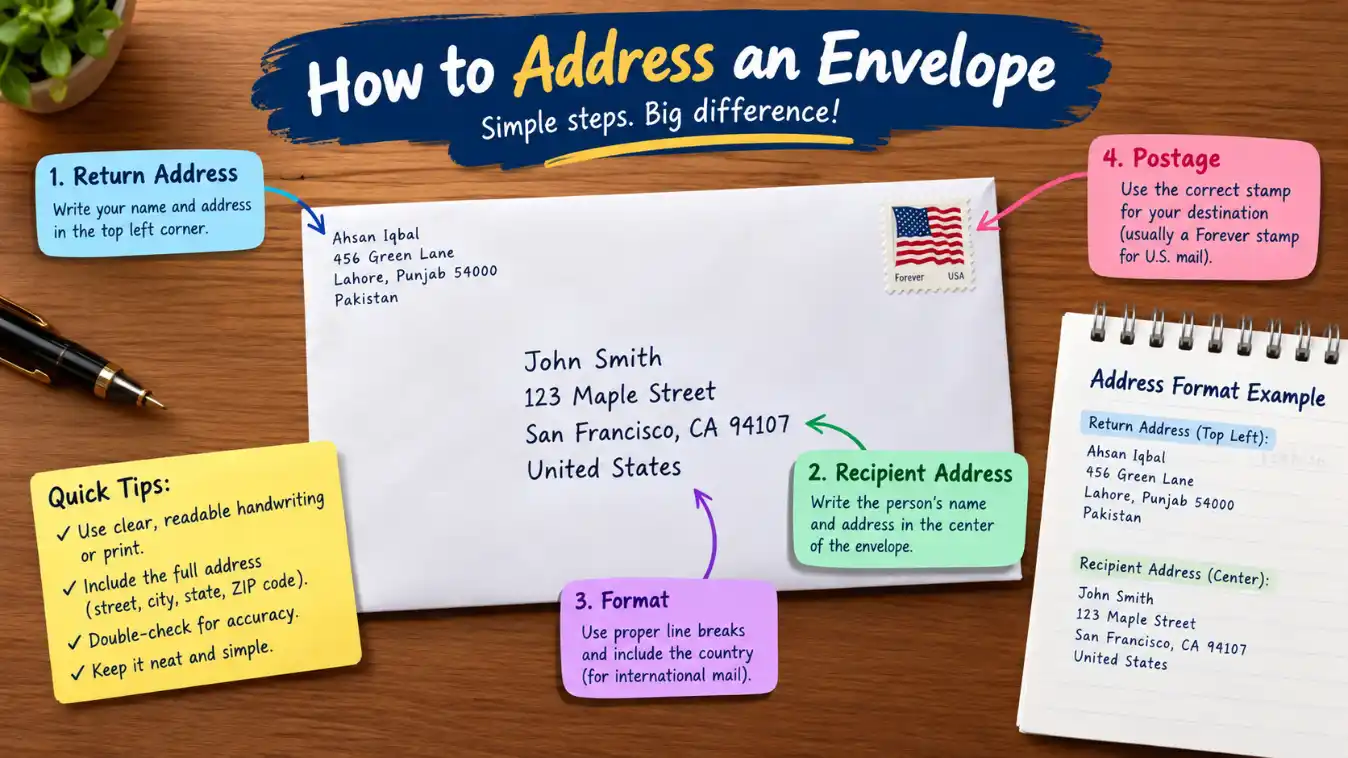
In an age of instant messaging, email, and same-day delivery apps, addressing an envelope by hand can feel like a forgotten art. Yet it’s a skill you’ll still need more often than you’d think. If you’re mailing a wedding invitation, sending a heartfelt thank-you note, paying a bill the old-fashioned way, submitting a job application that requests a physical copy, or writing to a friend who appreciates a handwritten letter, knowing how to properly address an envelope ensures your mail actually reaches its destination without delay.
It might seem simple at first glance just to write a name and address, right? But there’s a correct format behind it: precise placement for the return address, postage, and recipient’s address, along with formatting rules that shift depending on who or where you’re mailing to. A business letter follows slightly different conventions than a formal wedding invitation. An international address requires details a domestic one doesn’t. Even something as small as where you place the apartment number can affect how quickly your mail gets sorted and delivered.
Get any of this wrong, and your letter risks being delayed, returned to sender, or lost in transit altogether, an especially frustrating outcome when the contents matter, like an invitation with a deadline or a time-sensitive document.
In this guide, we’ll walk through every step of addressing an envelope correctly, from the basics of return address placement to special cases like international mail, military addresses, business correspondence, and formal invitation etiquette so your next piece of mail arrives exactly where it should.
Supplies Needed
Before you start addressing your envelope, gather a few basics: having the right materials on hand makes the whole process quicker and helps your envelope look neat and professional.
Pen and Ink Stick to black or blue ink for a clean, legible look; these colors are also easiest for postal scanning equipment to read. Avoid pencil, gel pens in unusual colors, or anything that smudges easily, since illegible writing can delay delivery.
Envelope Type and Size Envelopes come in a range of sizes for different purposes. A standard #The 10 envelope is the go-to for everyday letters and business correspondence. Smaller options like A2 or A7 envelopes are common for greeting cards and invitations. Choose a size that fits your contents without excessive folding, and make sure it matches your postage requirements.
Postage You’ll need either traditional stamps or metered postage. Stamps are widely available at post offices, grocery stores, and online. Metered postage, often used by businesses, is pre-calculated and printed directly onto the envelope or a label.
Labels (Optional Alternative) If your handwriting is hard to read, or you’re sending a large batch of mail, printed address labels are a practical alternative to handwriting. They ensure consistency and legibility, especially useful for mass mailings or official correspondence.
Anatomy of an Envelope
Before diving into the writing itself, it helps to understand the envelope’s layout. Every properly addressed envelope follows a consistent structure, and knowing where each element belongs will make the rest of this guide much easier to follow.
Front vs. Back All addressing happens on the front of the envelope. The back is typically left blank, though it’s sometimes used for a sender’s return address on formal invitations, or for sealing wax on especially formal correspondence.
The Four Key Zones The front of a standard envelope is divided into four functional areas:
- Return Address Zone Top-left corner, reserved for the sender’s information.
- Postage Zone Top-right corner, where the stamp or metered postage goes.
- Recipient Address Zone Centered, slightly below the middle of the envelope, where the destination address is written.
- Barcode/Scan Zone The bottom portion of the envelope, left clear for postal sorting equipment to print a barcode. Avoid writing or stamping anything in this area.
Why Placement Matters Postal services, including USPS, rely on optical character recognition (OCR) and automated sorting machines to process mail efficiently. Keeping each element in its designated zone and avoiding overlap with the scan zone helps ensure your envelope is read correctly and doesn’t get delayed or mishandled.
Step-by-Step: Writing the Return Address
The return address tells the postal service and the recipient who the mail is from. It’s also essential if your envelope can’t be delivered and needs to be sent back to you.
Placement Write the return address in the top-left corner of the envelope, leaving a small margin from the edges. It should be noticeably smaller than the recipient’s address so it doesn’t draw the eye or compete for attention.
Format and Order Write your return address on three lines, in this order:
Your Name
Street Address (or PO Box)
City, State ZIP Code
Keep each line concise and legible. If you live in an apartment or unit, include that number directly after the street address, either on the same line or the line below.
Mailing Without a Return Address While not required by law for most domestic mail, skipping the return address is generally discouraged. Without one, an undeliverable letter can’t be returned to you; it will likely end up at a mail recovery center or be discarded. It’s best practice to always include it, even for casual mail.
Business Return Addresses For business correspondence, the return address typically includes the company name above the street address, and sometimes a logo or pre-printed letterhead design:
Company Name
Street Address
City, State ZIP Code
Many businesses use pre-printed envelopes or return address labels to keep this consistent across all outgoing mail.
Step-by-Step: Placing Postage
Postage tells the postal service that your mail is paid for and ready to send. Getting the placement and amount right avoids delays, returns, or postage-due charges to the recipient.
Correct Corner and Orientation Place the stamp in the top-right corner of the envelope, opposite the return address. Position it right-side up and roughly a quarter-inch from the top and right edges. A crooked or upside-down stamp won’t affect delivery, but a neat placement gives a more polished impression.
Calculating Postage by Weight and Size Standard postage covers letters up to a certain weight (typically one ounce in the U.S.) and a standard size. Heavier letters, thicker envelopes, or non-standard shapes usually require additional postage. If you’re unsure, weigh your envelope or take it to a post office counter to have it checked. Using too little postage can result in the letter being returned or delivered with a postage-due fee charged to the recipient.
Extra Postage for Oversized, Heavy, or International Mail
- Oversized or rigid envelopes (square, very thick, or containing bulky items) often incur a non-machinable surcharge.
- Heavier letters require additional stamps or a higher-denomination stamp for each extra ounce.
- International mail requires different postage rates entirely, and international stamps or Global Forever stamps should be used rather than standard domestic ones.
Metered Mail vs. Stamps Metered postage is printed directly onto the envelope or a label using a postage meter, commonly used by businesses for high-volume mailing. It shows the exact amount paid and often includes the date. Stamps remain the standard choice for personal mail and are widely available at post offices, retailers, and online.
Step-by-Step: Writing the Recipient’s Address
The recipient’s address is the most important element on the envelope, since it directly determines where your mail ends up. Precision and clarity here matter more than anywhere else on the envelope.
Centering and Spacing Write the recipient’s address roughly in the center of the envelope, slightly below the midpoint. Leave enough white space around it so it doesn’t crowd the edges or overlap with the postage or barcode zones.
Order of Lines Write the address on three lines, in this order:
Recipient’s Name
Street Address (with Apartment/Unit/Suite if applicable)
City, State ZIP Code
Each line should be clear and left-aligned relative to the block, even though the block itself is centered on the envelope.
Titles, Suffixes, and Honorifics Include appropriate titles before the name when known Mr., Mrs., Ms., Dr., etc. and suffixes after, such as Jr., Sr., or Esq. for legal professionals. For example:
Dr. Michael Chen Jr.
Using the correct title shows attention to detail and is especially expected in formal or professional correspondence.
Apartment, Unit, and Suite Numbers Apartment or unit numbers should appear directly after the street address, either on the same line separated by a comma, or on their own line:
456 Oak Avenue, Apt 3B
or
456 Oak Avenue
Apt 3B
Never omit this number if applicable, missing unit numbers are one of the most common causes of delivery delays in multi-unit buildings.
Attention Lines for Businesses When mailing to a specific person within a company, add an “ATTN:” (Attention) line above the street address:
ABC Marketing Inc.
ATTN: Sarah Johnson
789 Business Blvd
Chicago, IL 60601
Care-Of (“c/o”) Addressing Use “c/o” (care of) when mailing to someone at an address that isn’t officially theirs for example, a guest staying with someone else:
Emily Brooks
c/o James Miller
321 Elm Street
Denver, CO 80202
P.O. Box vs. Street Address If mailing to a P.O. Box, use only the box number do not include a street address as well, since postal carriers deliver based on whichever is listed first and this can cause confusion:
Robert Lee
PO Box 4521
Austin, TX 78710
Special Formatting Cases
Not every piece of mail follows the standard single-recipient format. Here’s how to handle the most common exceptions.
Addressing to a Couple or Family For a married couple sharing a last name, the traditional format is:
Mr. and Mrs. John Smith
For couples with different last names, list both full names, either on one line or two:
Jane Smith and John Reynolds
For a family, “The [Last Name] Family” is a common informal option:
The Smith Family
Addressing to a Company or Department When mailing to an organization rather than an individual, lead with the company name, followed by the department if relevant:
XYZ Corporation
Human Resources Department
100 Corporate Drive
New York, NY 10001
International Addresses International mail requires an extra line for the destination country, written in capital letters as the final line of the address, after the city/region and postal code:
John Doe
12 Baker Street
London W1U 6TU
UNITED KINGDOM
Address formatting conventions vary by country; some place the postal code before the city, others use different line orders so it’s worth checking the destination country’s standard format when possible.
Military Addresses (APO/FPO/DPO) Military mail uses Army/Air Post Office (APO), Fleet Post Office (FPO), or Diplomatic Post Office (DPO) designations instead of a city and country. The format looks like:
SGT John Smith
Unit 2050 Box 4190
APO AP 96278
Here, “AP,” “AE,” or “AA” replace the state and function as a military “state code,” and no country name is used, since APO/FPO/DPO mail is treated as domestic postage regardless of the service member’s actual overseas location.
Wedding Invitations Formal wedding invitations traditionally use two envelopes:
- The outer envelope includes the full formal address (guest’s full name, no abbreviations, spelled-out titles) and the couple’s return address.
- The inner envelope (if used) includes a more casual version of the guest’s name, such as “Mr. and Mrs. Smith” or “The Smith Family,” and does not include a full address.
Formal etiquette also calls for spelling out words like “Street,” “Avenue,” and state names in full, rather than using abbreviations.
Handwriting & Legibility Best Practices
Even a perfectly formatted address can cause delivery problems if it can’t be read by a human or a machine. This section covers how to keep your handwriting mail-ready.
Print vs. Cursive Printed (block) letters are strongly preferred over cursive. Cursive handwriting, however elegant, is harder for both postal workers and automated systems to interpret accurately, especially with unfamiliar names or street names. If legibility is a concern, printing in neat capital letters is the safest choice.
Why Legibility Affects Automated Sorting Most postal services, including USPS, use optical character recognition (OCR) technology to read addresses and sort mail automatically. When handwriting is unclear, the system can misread letters or numbers, sending the piece to a manual processing queue or in worse cases, to the wrong address entirely. Clear handwriting keeps your mail moving through the fastest possible sorting path.
Common Mistakes That Delay Delivery
- Illegible ZIP codes: a single misread digit can send mail to the wrong region entirely.
- Missing apartment or unit numbers are especially problematic in multi-unit buildings, where mail can be misdelivered or returned.
- Crossed-out corrections scratching out and rewriting part of an address looks messy and can confuse sorting equipment; if you make a mistake, it’s better to start with a fresh envelope.
- Inconsistent letter sizing writing some letters much larger or smaller than others can make words harder to scan and read.
- Overly decorative fonts or flourishes are nice for personal flair, but risky if it sacrifices clarity.
Quality Control Checklist
Before you seal and send your envelope, take a moment to double-check the details. A quick review now can save your mail from being delayed, returned, or lost entirely.
Verify the Address
- Confirm the recipient’s name, street address, city, state, and ZIP code are all correct.
- If you’re unsure of a ZIP code, use the USPS ZIP Code Lookup tool (or your country’s postal service equivalent) to verify it.
- Double-check the spelling of street names and the recipient’s name, especially for unfamiliar or uncommon spellings.
Check Postage Sufficiency
- Make sure the postage matches the envelope’s weight and size when in doubt, weigh it or have it checked at a post office counter.
- Confirm you’re using the correct postage type (domestic vs. international, standard vs. non-machinable surcharge).
- Ensure the stamp or metered postage is clearly visible and undamaged.
Seal and Inspect
- Seal the envelope securely so contents don’t fall out or shift during transit.
- Do a final visual check: is the return address complete, the recipient address centered and legible, and the postage properly placed?
- Make sure nothing is written or stamped in the bottom barcode/scan zone.
Quick Checklist Recap
- [ ] Return address in top-left corner
- [ ] Postage in top-right corner
- [ ] Recipient address centered, legible, and complete
- [ ] ZIP code verified
- [ ] Apartment/unit number included if applicable
- [ ] Bottom scan zone left clear
- [ ] Envelope sealed
Visual Example/Template
Sometimes it’s easiest to see it all put together. Below are two fully labeled examples one for a personal letter, one for a business letter showing exactly how each element fits on the envelope.
Example 1: Personal Letter
[STAMP]
Jane Smith
123 Maple Street
Springfield, IL 62704
Mr. and Mrs. John Reynolds
456 Oak Avenue, Apt 3B
Chicago, IL 60601
- Return address (top-left): Jane Smith’s info, smaller and compact
- Postage (top-right): single first-class stamp
- Recipient address (center): includes honorific and apartment number
- Bottom third of envelope: left blank for barcode scanning
Example 2: Business Letter
[METERED POSTAGE]
ABC Marketing Inc.
789 Business Blvd
Chicago, IL 60601
XYZ Corporation
ATTN: Sarah Johnson
Human Resources Department
100 Corporate Drive
New York, NY 10001
- Return address (top-left): company name and address, often pre-printed
- Postage (top-right): metered postage strip instead of a stamp
- Recipient address (center): includes ATTN line and department, adding an extra line to the standard three-line format
- Bottom third of envelope: left blank for barcode scanning
Key Differences to Note
- Business envelopes often use metered postage rather than stamps.
- Business addresses may include additional lines (ATTN, department) that personal letters typically don’t need.
- Formal/personal letters emphasize honorifics; business letters emphasize company hierarchy (company → contact → department).
Troubleshooting
Even with careful attention, addressing mistakes happen. Here’s what to expect if something goes wrong, and how to fix issues before they become a problem.
What Happens If an Envelope Is Addressed Incorrectly If the recipient’s address is incomplete, illegible, or incorrect, the postal service will typically attempt one of the following:
- Manual processing if OCR can’t read the address, a human sorter will attempt to interpret and route it, which slows delivery.
- Return to sender if the address is undeliverable and a return address is present, the mail is sent back.
- Forwarding if the recipient has an active mail forwarding order on file, mail may be redirected to their new address automatically.
- Misdelivery in rare cases, mail with a partially correct address may be delivered to the wrong location entirely.
How Undeliverable Mail Is Handled When mail can’t be delivered and has no usable return address, it’s typically sent to a Mail Recovery Center (in the U.S., USPS operates these facilities). There, staff attempt to identify the sender or recipient using any available information inside the envelope. If no match can be made within a set period, unclaimed mail may eventually be discarded, and valuables or checks may be handled through separate recovery procedures.
Fixing a Mistake Before Mailing
- Wrong information written: Don’t cross out and rewrite on the same envelope it looks unprofessional and can confuse scanning equipment. Start with a fresh envelope instead.
- Uncertain about a ZIP code or address: Verify it using an official postal lookup tool before sealing the envelope.
- Already sealed with an error inside: If you catch a mistake after sealing, it’s usually safer to prepare a new envelope rather than trying to reopen and reseal, which can look tampered with.
- Insufficient postage discovered after mailing: In many cases, the postal service will either forward the mail with a postage-due notice to the recipient, or return it to you, depending on the country and postal provider’s policy.
Quick-Reference Summary
For a fast recap, here’s the entire process condensed into one cheat sheet:
| Element | Placement | Format |
| Return address | Top-left corner | Name / Street / City, State ZIP |
| Postage | Top-right corner | Stamp or metered postage |
| Recipient address | Center, slightly below midpoint | Name / Street (+ Apt/Unit) / City, State ZIP |
| Barcode zone | Bottom third | Leave blank |
Golden rules to remember:
- Print clearly in black or blue ink.
- Always include a return address.
- Double-check ZIP codes and apartment/unit numbers.
- Use “ATTN,” “c/o,” or department lines when mailing to businesses or specific people at another address.
- Add the country in capital letters as the last line for international mail.
- Never write in the bottom scan zone.
- When in doubt, verify the address and weigh the envelope before mailing.
Conclusion
Addressing an envelope might seem like a small, old-fashioned task, but it’s one of those skills that pays off the moment you actually need it if you’re sending a wedding invitation across the country, mailing a resume, or writing a handwritten note to someone who’ll appreciate the effort. Getting the format right isn’t complicated once you know the rules: keep the return address, postage, and recipient address in their proper zones, write clearly, and double-check the details before sealing.
The next time you sit down to mail something, you won’t have to think twice, just grab a pen, follow the format, and send it off with confidence that it’ll land exactly where it’s supposed to.

I am Toni Morrison an acclaimed American novelist and Nobel Prize winner whose powerful storytelling explored identity, memory, love, heritage, and the human spirit through unforgettable literary works at Spiritualdreamz.com.