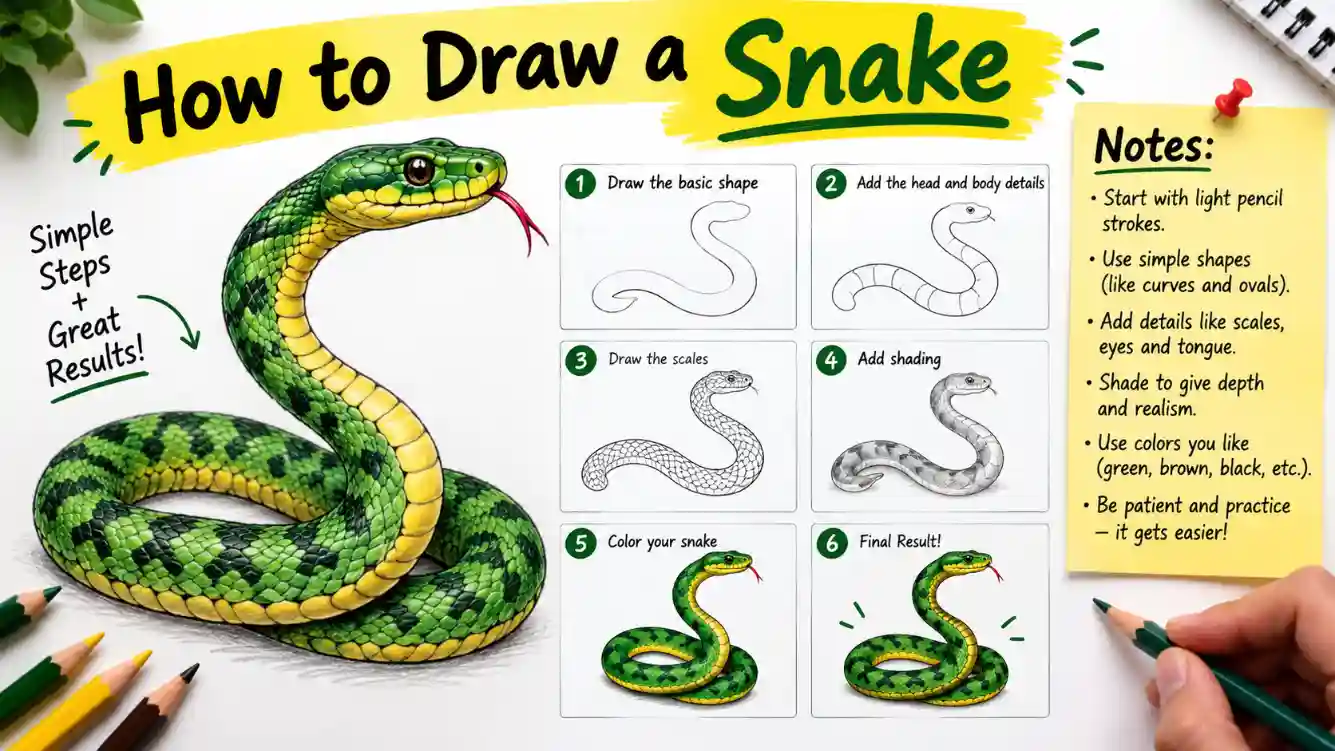
To draw a snake, start with a light, flowing S-shaped line to plan the body. Add two curved lines around it to create the body thickness, then shape the head and taper the tail to a point. Finish with eyes, a mouth, forked tongue, scales, patterns, and optional shading or color.
Key Takeaways
- Start with a simple curved guideline instead of drawing the finished snake immediately.
- Keep the snake’s body fairly consistent in width and gradually taper the tail.
- Use an oval or rounded shape to build the head before adding facial details.
- Add scales and patterns after the main outline is correct.
- You can turn the basic drawing into a cute cartoon, coiled, or realistic snake by changing the head, body shape, and details.
What You Need to Draw a Snake
You do not need expensive art supplies to learn how to draw a snake. A basic setup is enough:
- Drawing paper
- Pencil
- Eraser
- Black pen or marker
- Colored pencils, crayons, or markers if you want to add color
For beginners, a pencil is especially useful because you can make the first lines light and erase them after completing the outline. Many beginner tutorials use simple paper-and-pencil methods rather than specialized equipment.
The most important tool, however, is a good reference. Look at a photograph or illustration of a snake if you want to understand its body shape, head, scales, and patterns.
How to Draw a Snake Step by Step
Step 1: Draw the Main Body Curve
Begin with one long, light, flowing line.
Make it look like a large S curve rather than a perfectly straight line. This line represents the snake’s spine and helps you decide how the body will move across the page.
Do not worry about making the line perfect. The goal is to establish the overall movement of the snake.
A smooth flowing curve is one of the most common starting points in beginner snake-drawing tutorials.
Step 2: Add the Body Thickness
Now draw another curved line beside the first one.
Keep the two lines relatively close together to create the snake’s body. The body should generally remain rounded and become narrower as it approaches the tail.
Think of the snake as a long tube rather than two flat lines.
Leave the lines slightly wider around the middle and neck area if you want a more natural appearance. Then gradually narrow the body toward the tail.
Beginner tip: Do not draw individual scales yet. Get the overall body shape correct first.
Step 3: Shape the Head
At one end of the body, create the snake’s head.
For a simple snake, you can use an oval or slightly pointed shape. Make the head wider than the neck so that it is easy to recognize.
You can make the head:
- Rounded for a cute cartoon snake
- Wider and more angular for a realistic snake
- Raised slightly for a more active pose
- Flattened for a snake resting on the ground
Many beginner tutorials build the head from simple rounded shapes before adding details.
Step 4: Add the Face
Once the head shape looks right, add the facial features.
Start with two small eyes. Depending on the style, the pupils can be round or narrow vertical shapes.
Then add:
- Two small nostrils
- A curved mouth
- A forked tongue
The tongue is an easy detail that immediately makes the drawing recognizable as a snake.
For a cartoon snake, make the eyes larger and friendlier. For a realistic drawing, keep the eyes smaller and pay more attention to the shape of the head.
Step 5: Create the Tail
The tail should gradually become thinner.
Follow the body’s existing curve and slowly bring the two outer lines closer together until they meet at a pointed end.
Avoid making the tail suddenly narrow. A gradual taper usually looks more natural.
If your snake is curled, let the tail follow the direction of the coil instead of forcing it into a straight line.
Step 6: Add the Belly and Scales
Now that the basic outline is finished, you can add surface details.
A simple way to show the belly is to draw a line along the underside of the snake. Add short curved or horizontal divisions to suggest belly scales.
For the rest of the body, you do not need to draw every individual scale.
Instead, use small repeated shapes or patterns. Depending on the species or style, you can use:
- Diamonds
- Small curved marks
- Spots
- Stripes
- Zigzag patterns
- Overlapping scale shapes
If you are drawing a realistic snake, make the scales smaller around the edges and larger where the body is facing you. This helps suggest the snake’s rounded form.
Step 7: Add Patterns and Texture
This is where your snake can develop its personality.
A simple cartoon snake might have large spots or stripes. A more realistic snake can have subtle repeating patterns.
You can also change the colors. For example:
| Snake Style | Possible Colors | Pattern Idea |
| Cartoon | Green, yellow, red | Large spots |
| Garden-style | Green, brown | Small irregular marks |
| Desert-style | Tan, brown | Bands or patches |
| Fantasy | Purple, blue, green | Scales or unusual patterns |
| Realistic study | Natural colors | Species-specific markings |
If you are drawing a particular species, use a reference image instead of guessing its markings.
Step 8: Outline, Shade, and Color
Once you are happy with the pencil sketch, erase unnecessary guidelines.
You can then trace the important lines with a black pen or marker.
For a three-dimensional effect, add darker shading underneath the body and around areas where the snake bends. Leave the upper-facing areas lighter.
You do not need complicated shading. A few controlled darker areas can make a flat drawing look more rounded.
Finally, add color if you want. Start with a light layer and gradually build darker areas.
How to Draw a Cute Cartoon Snake
A cartoon snake is one of the easiest versions for beginners.
Start with a simple curved body and make the head slightly larger compared with the body. Give the snake large eyes, a small smile, and a short forked tongue.
You can exaggerate the expression by raising the eyebrows or widening the eyes.
For a friendly illustration, use smooth, rounded lines rather than sharp angles.
This approach is common in beginner and children’s drawing tutorials because it reduces complicated anatomy to simple shapes.
How to Draw a More Realistic Snake
For a realistic snake, focus less on decoration and more on form, proportion, and light.
Start with a reference photograph. First identify the direction of the spine, then build the body around it.
Pay attention to:
- The width of the neck
- The shape of the head
- The taper of the tail
- How the body bends
- Where the body overlaps itself
- The direction of the light
- The size and arrangement of scales
You do not have to draw every scale individually. Realistic-looking texture can often be suggested with carefully placed patterns and shading.
A reference-based approach is particularly useful when you want accurate proportions and natural anatomy.
How to Draw a Coiled Snake
A coiled snake can look complicated because parts of its body pass in front of or behind other parts.
Start by drawing the overall coil first. Think of it as a large spiral or series of overlapping loops.
Then:
- Mark where the head will be.
- Draw the outside edge of the coil.
- Add the inner edge.
- Show which section passes over another.
- Add the head and tail.
- Add patterns and shading last.
The important part is making the overlaps clear. If the lines cross without indicating which body section is on top, the snake can look flat or confusing. Coiled-snake tutorials commonly emphasize the overall loop and body placement before adding smaller details.
Common Snake Drawing Mistakes
Making the body too straight:
Use a flowing S curve or several gentle curves to create movement.
Making the tail too thick:
Gradually reduce the width instead of narrowing it suddenly.
Adding scales too early:
Finish the main body and head before spending time on small details.
Making the head too large:
Unless you are intentionally drawing a cartoon snake, keep the head proportionate to the body.
Using the same line weight everywhere:
Slightly varying your line weight can make the drawing feel more natural.
Forgetting the body’s roundness:
Use shading or curved scale patterns to show that the snake is a three-dimensional form.
Frequently Asked Questions
How do you draw a simple snake?
Start with a long S-shaped curve for the body. Draw another curved line beside it to create the body’s thickness, then add a rounded head and gradually taper the opposite end into a tail. Finish with simple eyes, a mouth, and a forked tongue. This basic method works well for beginners and can be expanded with patterns and color.
How do you draw snake scales?
For a simple drawing, you can represent scales with small curved, diamond, or repeating shapes. Start with larger, simple patterns rather than drawing every scale. If you want a realistic result, follow the body’s curves so the scale pattern appears to wrap around the rounded form.
How do you draw a snake head?
Begin with an oval, rounded, or slightly angular shape attached to the neck. Add the eyes, nostrils, mouth, and tongue. The exact shape depends on the type of snake you are drawing, so a reference image can help you create more accurate proportions.
How do you make a snake look realistic?
Focus on the body’s curves, proportions, head shape, tapering tail, surface pattern, and shading. Use a reference photo when possible. Rather than drawing thousands of individual scales, use scale patterns and controlled shading to suggest texture and depth.
Can kids learn how to draw a snake?
Yes. A snake is a useful beginner drawing because its body can be built from simple curved lines. Children can start with a cartoon version using a large head, simple eyes, a curved body, and a pointed tail, then add colors and patterns.
Conclusion
Learning how to draw a snake becomes much easier when you break the animal into simple shapes. Start with the body’s flowing curve, build its thickness, shape the head, taper the tail, and then add facial features and patterns.
Once you are comfortable with the basic version, experiment with different poses. Try a cute cartoon snake, a realistic snake, or a snake curled into a coil. The key is to get the large shapes and movement right before worrying about small details.
With a pencil, paper, and a little practice, you can create a snake drawing that looks simple, expressive, and polished.

I am Toni Morrison an acclaimed American novelist and Nobel Prize winner whose powerful storytelling explored identity, memory, love, heritage, and the human spirit through unforgettable literary works at Spiritualdreamz.com.