Introduction
Few shapes say “fall” quite like a pumpkin round, ridged, and instantly recognizable, it’s one of the most satisfying subjects for artists of any skill level to draw. If you’re sketching for Halloween decorations, greeting cards, or simply looking for a fun seasonal doodle, a pumpkin drawing comes together with just a few basic shapes and lines.
The best part? You don’t need advanced artistic training to create a pumpkin that looks great. With a simple circle as your starting point, a handful of curved ridge lines, and a stem on top, you can build a convincing pumpkin in minutes. From there, you can take it in any direction: a cheerful cartoon pumpkin, a spooky jack-o’-lantern, or a more realistic, shaded version.
In this guide, we’ll break the process down step by step, covering everything from basic shapes to shading, coloring, and fun variations you can try.
Materials You’ll Need
You don’t need an expensive art kit to draw a great pumpkin; a few basic supplies will get you started.
For paper, plain printer paper works fine for practice sketches, but a dedicated sketchbook with slightly thicker paper handles erasing and shading better. If you plan to color your finished drawing, choose paper suited to your coloring: medium smooth paper for markers, textured paper for colored pencils.
For pencils, keep a couple of grades on hand. An HB or 2B pencil works well for your initial light sketch, while a softer 4B or 6B pencil helps you add darker shading later.
Don’t skip the eraser. A kneaded eraser lets you lift graphite gently without smudging or damaging the paper, which is especially useful when you’re adjusting proportions early on.
Once you’ve finalized your linework, a fineliner or marker lets you ink over your pencil lines for crisp, clean edges.
For coloring, colored pencils give you the most control over shading and blending, markers deliver bold, vibrant color quickly, and watercolors work well if you want a softer, more painterly finish.
If you’re drawing digitally, any tablet and app with layer support like Procreate or Photoshop works well, letting you separate your sketch, linework, and color onto different layers.
Understanding Pumpkin Shape and Anatomy
Before you start drawing, it helps to understand what makes a pumpkin look like a pumpkin rather than just a circle.
At its core, a pumpkin has a rounded or slightly oval body. Real pumpkins vary quite a bit in shape, some are short and wide, others taller and more oval so there’s no single “correct” proportion to follow.
Running down the surface, you’ll find ridges and lobes: the curved vertical grooves that divide the pumpkin into segments. These ridges usually run from the top, near the stem, down to the bottom, and they curve slightly to follow the pumpkin’s rounded form rather than running perfectly straight.
At the top sits the stem, typically thick, slightly ridged or textured, and often bent at an angle rather than standing perfectly upright.
Many pumpkins also feature a vine, a thin, curling tendril that grows near the stem and adds a nice decorative detail to a finished drawing.
If you have access to a real pumpkin or even photos, take a moment to observe how the ridges curve around the form and how the stem attaches. This small bit of reference study makes a big difference in the final result.
Step-by-Step: Basic Pumpkin Shape
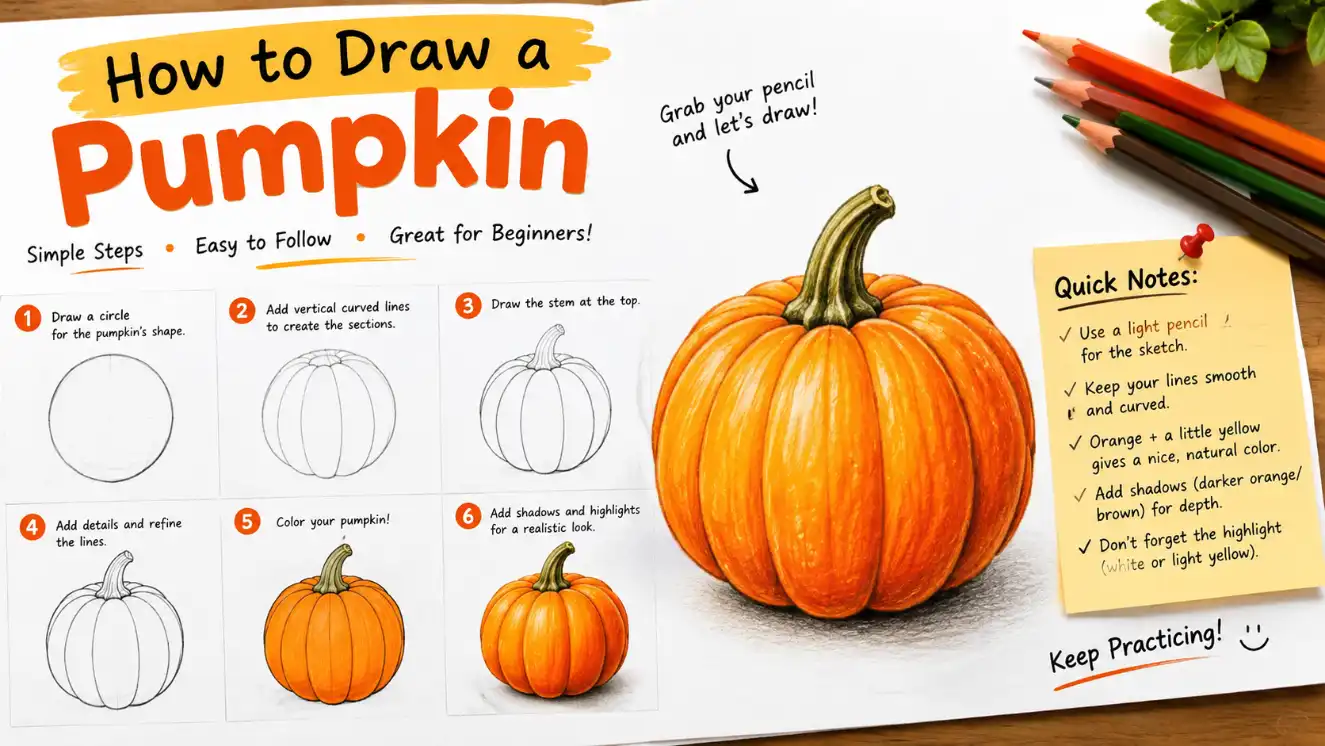
Start every pumpkin drawing with a light, loose sketch; you’ll firm up the lines later, so don’t worry about perfection yet.
Begin by drawing a circle or oval as your base shape. Decide if you want a wide, squat pumpkin or a taller one, and adjust the proportions of your oval accordingly. A slightly flattened circle, wider than it is tall, gives you the classic pumpkin look.
Keep your pencil strokes light at this stage. Sketching loosely, rather than pressing down hard, makes it much easier to erase and adjust the shape if the proportions look off.
Once you’re happy with the basic outline, take a moment to check its symmetry. Step back from the page, or hold it at arm’s length, to spot any obvious lopsidedness before moving forward.
This base shape acts as your foundation for everything that follows, so it’s worth spending an extra minute getting it right. A slightly imperfect circle actually works in your favor here; real pumpkins are rarely perfectly round, so a bit of organic irregularity will make your drawing look more natural.
Step-by-Step: Adding Ridges and Structure
With your base shape in place, you can now add the ridges that give a pumpkin its signature look.
Draw a series of curved vertical lines running from the top of the pumpkin to the bottom, following the roundness of your circle rather than drawing them straight. Each line should curve outward slightly in the middle, mimicking the way ridges bulge on a real pumpkin.
Space your ridges evenly around the shape. Most pumpkins look convincing with six to eight ridges, though you can add more or fewer depending on the style you’re going for.
To create a sense of depth, make the ridges toward the center of the pumpkin’s visible surface slightly wider apart, while ridges curving around the sides appear closer together, since you’re viewing them at more of an angle. This subtle adjustment gives your flat drawing a rounded, three-dimensional appearance.
Take your time with this step, since uneven or oddly spaced ridges are one of the most common mistakes beginners make. Light guideline dots around the circle’s edge, marking where each ridge will start, can help you keep the spacing consistent before you commit to the final curved lines.
Step-by-Step: Stem and Vine Details
The stem and vine add personality and realism to your pumpkin, so don’t rush through this step.
Draw the stem at the top of your pumpkin, where the ridges converge. Rather than a simple straight line, give it some thickness and texture. Real pumpkin stems are often ridged themselves and bend slightly to one side rather than standing perfectly straight up.
Add a few short, curved lines along the stem to suggest its rough, fibrous texture. This small detail makes a big visual difference and helps the stem read as woody rather than smooth.
For an optional but charming addition, draw a curly vine extending from the base of the stem. Curling vines work well as a spiral shape starts wide and coils the line inward, tapering it to a point.
You can also add a small leaf near the stem for extra detail. A simple pointed oval shape with a few vein lines works well and doesn’t require much extra effort.
These details are optional, so feel free to skip them for a simpler, cleaner pumpkin, or include them if you want a more decorative, illustrative finished piece.
Adding a Face (Jack-o’-Lantern Style)
If you want to turn your pumpkin into a classic jack-o’-lantern, adding a carved face is the next step.
The most traditional approach uses triangle eyes and a triangle nose, evenly spaced near the center-top of the pumpkin’s front-facing surface. Keep the triangles roughly the same size for a balanced, symmetrical look.
For the mouth, a jagged, zigzag line creates the classic jack-o’-lantern grin, while a simple curved line gives a friendlier, rounder smile instead.
Consider the expression you want before you start: happy faces typically use upward-curving mouths and rounder eye shapes, scary faces favor sharp angles and asymmetry, and silly faces can break the rules entirely with mismatched eyes or a crooked grin.
Pay attention to placement and symmetry. Lightly sketch a vertical guideline down the center of the pumpkin first, then position your eyes and nose evenly on either side of it before committing to final lines.
Don’t feel locked into the classic template jack-o’-lantern faces are endlessly customizable, so experiment with different shapes and expressions until you find one that fits the mood you’re going for.
Shading and Texture Techniques
Shading transforms a flat outline into a pumpkin that looks round and dimensional.
Start by deciding on a light source to imagine where light hits your pumpkin from, since this determines which areas stay light and which fall into shadow. A light source from the upper left, for example, means the right and lower areas of each ridge need darker shading.
Add shadow beneath each ridge, particularly along the edges where one ridge curves into the next. This subtle darkening emphasizes the three-dimensional groove between ridges.
For shading technique, cross-hatching layering intersecting pencil lines creates texture and works especially well for a hand-drawn, illustrative look, while blending with a blending stump or your finger creates smoother, more gradual shadows suited to a realistic style.
If you’re drawing a jack-o’-lantern, consider a glowing interior effect. Add soft shading around the carved eyes, nose, and mouth to suggest light spilling out from inside, with the brightest highlights directly around the cutout shapes fading into darker shadow further away.
Finally, add a few highlights of small areas left white or very lightly shaded near the top of the pumpkin’s rounded surface to suggest where light reflects most directly, giving the drawing a glossy or naturally lit finish.
Coloring the Pumpkin
Once your linework and shading feel complete, coloring brings your pumpkin fully to life.
Traditional orange remains the most popular choice, and blending a few shades a lighter orange for highlighted areas, a deeper burnt orange or brown for shadows creates a richer, more dimensional result than a single flat color.
Don’t feel limited to orange, though. White pumpkins offer a striking, elegant alternative, blue-green pumpkins (like Jarrahdale varieties) add an unusual seasonal twist, and green pumpkins work well for an unripe or stylized look.
Your choice of medium affects the final result. Colored pencils let you build up layers gradually and blend colors smoothly, making them ideal for realistic shading. Markers apply color quickly and boldly, working especially well for flat, graphic, or cartoon-style pumpkins. Watercolors create soft, natural-looking gradients, particularly effective for a more artistic or painterly finish.
Whichever medium you choose, add your highlights and shadows last, after your base color is in place. A touch of white or a lighter shade along the top-curved areas, paired with deeper shadow tones along the ridges and base, gives your finished pumpkin real depth and dimension.
Style Variations
Once you’ve mastered the basic pumpkin shape, try adapting it into different styles.
A cartoon or kawaii pumpkin uses exaggerated proportions, a rounder, squatter body, oversized eyes, and a simple, friendly expression and works well with bold outlines and flat colors rather than detailed shading.
A realistic or botanical pumpkin focuses on accurate proportions, detailed ridge texture, and careful shading to mimic how light falls across a real pumpkin’s surface, often paired with a naturalistic color palette and fine linework.
A simple line-art pumpkin strips the design down to clean outlines with minimal or no shading, making it perfect for coloring pages, kids’ activities, or a minimalist illustration style.
A classic Halloween jack-o’-lantern combines the basic pumpkin shape with a carved face and an implied glow, often rendered with higher contrast and darker surrounding shadows to emphasize the spooky, illuminated effect.
Experimenting across these styles helps you develop your own artistic voice and gives you a versatile pumpkin design for any project, from greeting cards to seasonal decor.
Common Mistakes and How to Fix Them
A few recurring issues trip up beginners when drawing pumpkins, but each one has a simple fix.
An uneven or lopsided shape often comes from rushing the initial sketch. Slow down at the base-circle stage, and check your proportions from a distance before adding any ridges or details.
Ridges that sit too close together or misalign usually happen when you skip the planning stage. Adding light guideline dots evenly around your base shape before drawing the ridges themselves solves this issue and keeps your spacing consistent.
A flat-looking pumpkin almost always comes down to insufficient shading. If your finished drawing looks two-dimensional, add more contrast between the light and shadow areas, particularly along the grooves between ridges.
Overworking details too early, jumping into fine texture or shading before your basic shape and proportions look right can waste time and make later corrections harder. Stick to a clear order: base shape, then ridges, then details, then shading, then color.
If you catch yourself making one of these mistakes, don’t worry pumpkins are forgiving subjects, and a few extra light strokes or a bit of erasing will get your drawing back on track.
Tips for Drawing Pumpkins with Kids
Pumpkins make an excellent drawing subject for children, since the shapes are simple and the results feel rewarding almost immediately.
Simplify the steps for young children by focusing on just three basic shapes: a circle for the body, a small rectangle or line for the stem, and a few simple curved lines for ridges. Skip shading and fine texture entirely for younger kids.
Guides and templates can help build confidence. Lightly drawing a circle for them to trace, or printing a simple pumpkin outline, lets kids focus on the fun parts like adding a face or coloring without getting frustrated by proportions.
For the face, encourage kids to get creative rather than following a strict template. Silly, mismatched, or exaggerated features often make for the most charming results, and there’s no wrong way to draw a jack-o’-lantern face.
Keep the overall experience low-pressure and playful. The goal with young artists is building enthusiasm for drawing, not achieving technical accuracy, so celebrate their unique interpretations rather than steering them toward a “correct” pumpkin shape.
Digital Drawing Tips
If you’re drawing on a tablet rather than paper, a few adjustments make the digital process smoother.
Apps like Procreate, Photoshop, or Clip Studio Paint all support the same basic workflow: sketch, ink, color, and shade, but digital tools let you separate each stage onto its own layer.
Start with a sketch layer at low opacity, then create a new layer on top for your final linework, tracing over your rough sketch with cleaner, more confident strokes.
Once your linework is finalized, add a color layer beneath your line-art layer. Working beneath your lines means you can color loosely without worrying about covering up your outlines.
For shading, use a separate layer set to “multiply” blend mode, which lets you paint shadows that darken the colors beneath them naturally, without needing to color-match your shadow tones manually.
Digital tools also make it easy to experiment without commitment. You can duplicate your drawing to try different color schemes or face styles side by side, then simply delete the versions you don’t like.
FAQs
What’s the easiest way to draw a pumpkin?
Start with a simple circle or oval, add a few curved vertical lines for ridges, and top it with a stem. This basic approach creates a recognizable pumpkin in just a few steps, even without shading or color.
How do you make a pumpkin look 3D?
Add shading that follows a consistent light source, darkening the areas beneath each ridge and around the base, while leaving lighter highlights near the top where light would naturally hit the rounded surface.
How do you draw a jack-o’-lantern face?
Sketch a light vertical guideline down the center of the pumpkin, then add symmetrical triangle eyes and a triangle nose, along with a jagged or curved mouth depending on the expression you want.
Can beginners draw realistic pumpkins?
Yes. Realistic pumpkins simply require careful attention to proportion, ridge placement, and shading. Practicing the basic shape first, then gradually adding more detailed texture and shadow, makes realistic results achievable even for newer artists.
Conclusion
Drawing a pumpkin doesn’t require advanced skill, just a willingness to start with simple shapes and build up detail step by step. From a basic circle and a handful of curved ridges to a fully shaded, colored jack-o’-lantern, this approach breaks the process into manageable pieces that work for artists at any level.
If you’re creating a quick seasonal doodle, a detailed realistic illustration, or a fun coloring page for kids, the same core techniques apply: start loose, build your structure carefully, and add shading and color last. With a little practice, you’ll be able to draw pumpkins confidently in whatever style suits your project, from playful cartoons to spooky Halloween decorations.
I am Toni Morrison an acclaimed American novelist and Nobel Prize winner whose powerful storytelling explored identity, memory, love, heritage, and the human spirit through unforgettable literary works at Spiritualdreamz.com.