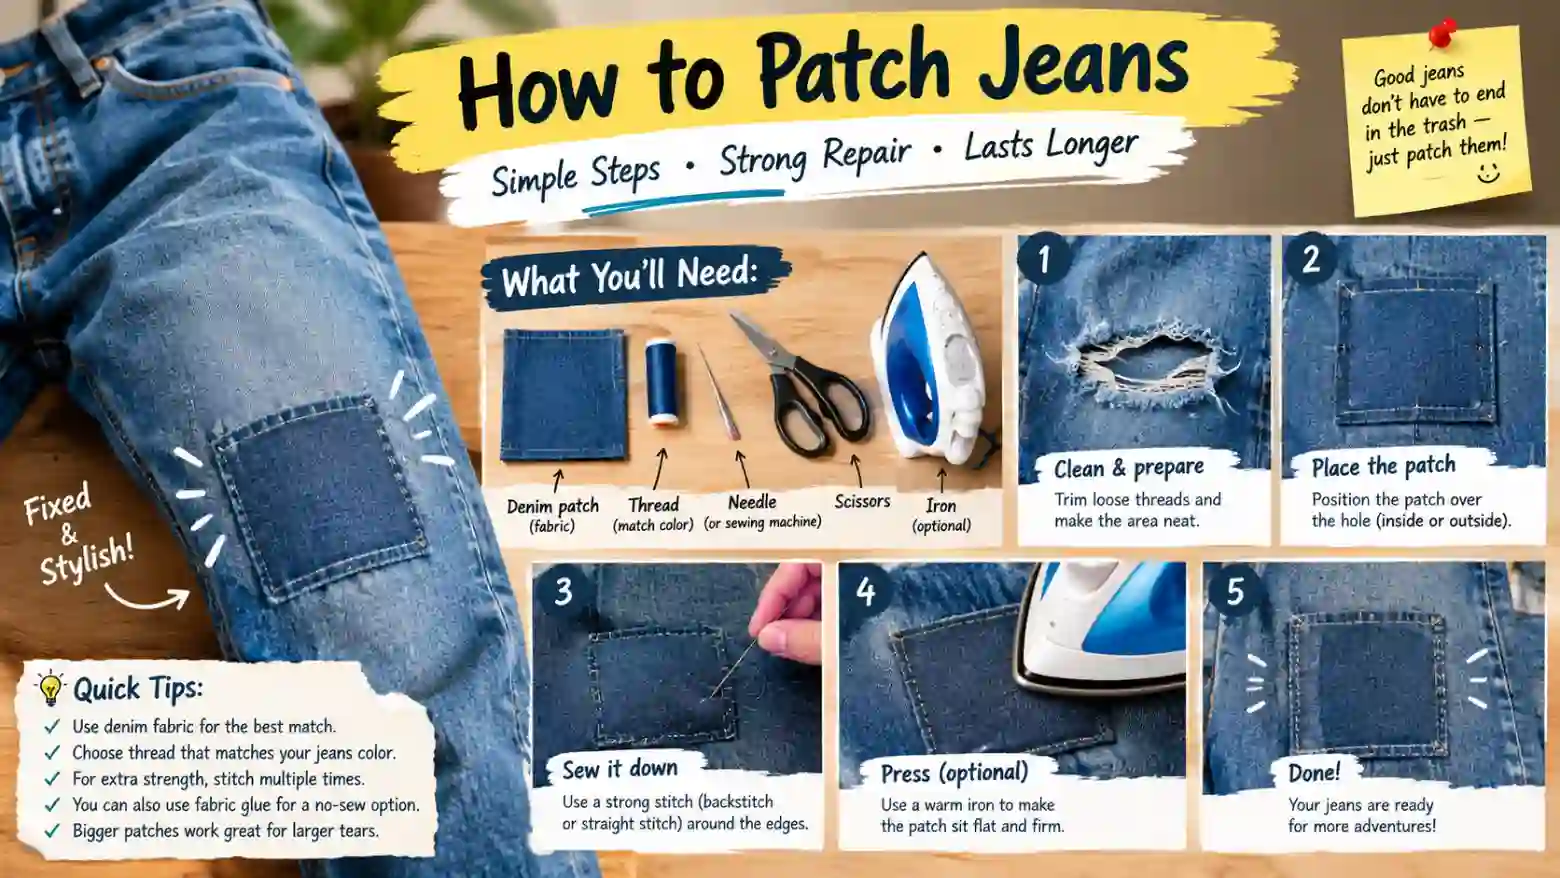
Few things beat a pair of jeans that fits perfectly, and few things are more disappointing than a hole in the knee. Before you toss them or pay for a repair, know that patching jeans at home is one of the easiest and most satisfying sewing skills to learn. You don’t need a machine, and you don’t need to be an expert.
A good patch can help your jeans last for years, save you money, and keep denim out of landfills. If you prefer a nearly invisible fix or a bold, visible repair, the process comes down to a few simple steps.
In this guide, you’ll learn how to assess the damage, choose the right patch, gather your supplies, and repair your jeans step by step. We’ll also cover different techniques, mistakes to avoid, care tips, and fixes for common problems. Grab your jeans and let’s get started.
Understanding Denim and Common Damage
Before you start stitching, it helps to know what you’re repairing. Denim is a sturdy cotton twill fabric with a diagonal weave. Traditionally, the vertical threads are dyed indigo while the horizontal threads stay white, which is why the inside of your jeans looks lighter than the outside. Many modern jeans also contain a little elastane, which gives them stretch.
Denim wears out in predictable places, and each type of damage calls for a slightly different fix:
- Worn or thin knees: friction and bending gradually weaken the fabric until it tears
- Crotch and inner-thigh blowouts: the highest-friction area, and the most common place for large rips
- Pocket tears: pockets wear out from keys, phones, and everyday pulling
- Small holes and punctures: caused by snags, sparks, or sharp objects
- Frayed hems: the bottoms of the legs drag on the ground and unravel
- Split seams: the stitching gives way, but the fabric itself is often fine
Knowing the type of damage matters because a split seam only needs restitching, while a large hole needs new fabric. Also pay attention to the area around the damage. If the surrounding denim is thin, it will keep tearing unless you reinforce a wider area.
Now that you know what you’re dealing with, you can choose a repair that fits.
The Basics of a Strong Patch
A patch is more than a cover-up. It works by replacing missing fabric and spreading stress over a wider area, so the edges of the hole stop pulling apart. Understanding a few principles will make your repair last far longer.
Go beyond the hole. The patch should extend at least one inch past the damage on every side. Stitching through weak, frayed fabric won’t hold, so your stitches need to anchor into strong denim.
Match the fabric. A patch cut from old denim will move, stretch, and age like the rest of your jeans. If your jeans stretch, choose a patch with stretch too, or the two fabrics will fight each other and cause puckering or new tears.
Mind the grain. Try to line up the direction of the weave on the patch with the jeans. This helps the patch flex naturally with your body.
Sewing beats glue. Iron-on adhesive is quick and convenient, but stitching provides long-term strength, especially in high-friction areas. The best repairs often combine both: adhesive to hold the patch in place, and thread to secure it.
Reinforce the hole itself. Stitching across the hole in rows, a technique called darning, rebuilds the weave and keeps the damage from spreading.
Once you know how a patch holds, you can choose the right approach with confidence.
Before You Start: Assess the Damage
Take a few minutes to examine your jeans and decide how to approach the repair. A quick assessment saves you from redoing the work later.
Small holes (under 1 inch). Darning or a small patch is usually enough. These are the easiest repairs and often nearly invisible.
Medium holes (1 to 3 inches). An interior patch stitched behind the hole works well. You can leave the hole visible or cover it with a decorative patch on top.
Large holes and blowouts. These need a larger patch and multiple rows of stitching that extend well into strong fabric. Crotch repairs in particular need extra reinforcement.
Split seams. Restitch along the original seam line, and reinforce it with a second row if the seam is under strain.
Check the surrounding fabric. Gently pull the denim around the hole. If it feels thin or starts to break, patch a larger area.
Decide on your look. Would you like the repair to blend in or stand out? An interior patch with matching thread is subtle, while a contrasting patch and bold stitching make a statement.
Know when to ask a tailor. If the jeans are very valuable, the damage is extensive, or you’re not comfortable with the repair, a professional tailor can help.
Plan for about 20 to 45 minutes for most repairs.
Supplies You’ll Need
Patching jeans doesn’t require an expensive kit. Most of these items are inexpensive and easy to find at a craft store or in a sewing kit.
Core Supplies
- Denim scrap or patch fabric: cut from old jeans, or buy pre-made patches
- Needle: a sturdy denim needle or sharp hand-sewing needle
- Strong thread: heavy-duty, upholstery, or denim thread in a matching or contrasting color
- Fabric scissors: sharp enough to cut clean edges
- Pins or sewing clips: to hold the patch in place
- Iron and ironing board: for pressing and setting the patch
Helpful Additions
- Fusible web or iron-on interfacing: to hold the patch before stitching
- Tailor’s chalk or fabric marker: to outline the patch and stitching lines
- Thimble: for pushing the needle through thick denim
- Seam ripper: for removing old stitches or fixing mistakes
- Cardboard or a mending form: to keep the leg open while you sew
- Embroidery floss or sashiko thread: for decorative visible mending
- Sewing machine and denim needle: an optional shortcut for large or long repairs
Supply Notes
Use a strong thread. Regular all-purpose thread often snaps under the tension denim experiences.
Choose your patch wisely. Old jeans make an excellent source of matching fabric, so save your worn-out pairs.
Wash the fabric first. Prewashing your patch prevents shrinking and puckering later.
Setup and Preparation
A little preparation makes the repair much smoother and helps your patch last.
Prepare the Jeans
- Wash and dry them first. This removes dirt and prevents the jeans from shrinking after you patch them.
- Trim loose threads. Cut away frayed edges around the hole so they don’t get caught in your stitches.
- Press the area flat. Ironing smooths wrinkles and makes positioning easier.
Prepare Your Workspace
- Find good lighting. You’ll be working with small stitches, so a bright light helps.
- Get comfortable. Sit at a table with your supplies within reach.
- Keep it safe. Store pins and needles in a pincushion, and take care with the hot iron.
Set Up the Fabric
Turn the jeans inside out for an interior patch, and slip a piece of cardboard or a flat mending surface inside the leg. This keeps you from accidentally sewing the leg shut and holds the fabric taut while you work.
Cut the Patch
Cut a piece of denim at least one inch larger than the hole on all sides. Round the corners slightly, since sharp corners tend to peel and catch.
With your jeans prepped and your workspace ready, you’re set to begin.
Step-by-Step: How to Patch Jeans
This method covers a classic interior patch, which is strong, durable, and works for most holes. Set aside about 30 to 45 minutes.
Step 1: Prepare the jeans. Wash, dry, and iron the jeans. Trim loose threads from the edges of the hole.
Step 2: Cut the patch. Cut a piece of denim at least one inch larger than the hole on all sides, with rounded corners.
Step 3: Position the patch. Turn the jeans inside out. Place the patch behind the hole with its outer (right) side facing the hole, so it shows through. Smooth out any wrinkles.
Step 4: Secure it. Pin or clip the patch in place. For extra hold, add a piece of fusible web between the patch and the jeans and press with an iron.
Step 5: Stitch around the edges. Turn the jeans right side out. Using a running stitch, whip stitch, or zigzag, sew around the edge of the patch through both layers.
Step 6: Darn across the hole. Stitch parallel rows across the hole, about ¼ inch apart, extending into the patch on both sides. Then weave rows in the other direction to form a grid.
Step 7: Reinforce. Add a second row of stitching around the outer edge of the patch for extra durability, especially in high-friction areas.
Step 8: Finish. Knot the thread securely on the inside and trim the ends.
Step 9: Press. Iron the repair flat to set the stitches and smooth the area.
Customizing Your Repair
Once you know the basic method, you can adapt it to suit your jeans and your style.
Choosing a Technique
- Interior patch: a patch stitched behind the hole. It’s the strongest and most common option.
- Exterior patch: a decorative patch stitched on top of the hole, often used for a bold look.
- Iron-on patch: the fastest option, best for low-stress areas or as a temporary fix.
- Darning: rebuilds the weave with stitching, ideal for small holes and thin spots.
- Machine stitching: speeds up the work on long tears and large patches.
Choosing Your Stitch and Thread
- Matching thread: for an invisible repair
- Contrasting thread: for a visible, decorative look
- Sashiko or embroidery stitching: for artistic visible mending
Adjusting for the Location
- Knees: use a slightly larger patch, and choose stretch fabric if your jeans stretch.
- Crotch or inner thigh: use a large patch and multiple rows of stitching for strength.
- Pockets: patch the pocket bag from the inside and reinforce the edges.
- Hems: restitch the hem, and consider adding a strip of denim tape for extra strength.
Stretch Denim Tips
Use a stretchy patch fabric and a flexible stitch such as a zigzag. Avoid pulling the thread too tight, since stiff stitches can snap when the fabric stretches.
Alternatives and Methods to Avoid
Hand-sewing an interior patch isn’t the only way to fix jeans, but some methods hold up much better than others.
Reasonable Alternatives
Iron-on patches. These are quick and require no sewing. They work well for low-stress areas, but in high-friction spots they tend to peel unless you also stitch around the edges.
Ready-made patches. Sew-on or iron-on patches come in many colors and designs, and are useful for covering damage with a decorative touch.
Visible mending. Sashiko and embroidery turn a repair into a design feature, and are a great way to make patches look intentional.
Professional repair. A tailor can repair large holes or use special stitching machines for a seamless finish, especially on expensive jeans.
Denim repair kits. These bundle patches, thread, and needles, which makes them a convenient starting point for beginners.
Methods to Avoid
- Using glue alone. Fabric glue can crack, peel, and stiffen the denim, especially after washing.
- Making the patch too small. A patch that barely covers the hole will pull away from the weak fabric around it.
- Stitching into frayed edges. Stitches need strong fabric to anchor into, or they’ll pull right out.
- Using thin thread. All-purpose thread often breaks under the strain of denim.
- Ignoring stretch. A rigid patch on stretch jeans will cause puckering and tearing.
- Ironing decorative patches directly. Use a pressing cloth to avoid melting or scorching.
The most reliable approach combines a properly sized patch with strong stitching.
Caring for Your Repaired Jeans
Once your patch is done, a little care will help it last for years.
Washing
- Turn jeans inside out. This protects both the fabric and the repair.
- Use cold water and a gentle cycle. Hot water can loosen adhesives and fade the fabric.
- Skip bleach and harsh detergents. They weaken threads and damage patches.
Drying
- Air dry when possible. High heat can weaken iron-on adhesive and shrink the patch.
- Use low heat if you must. Remove the jeans while they’re slightly damp.
Long-Term Care
- Check repairs regularly. Look for loose stitches or fraying edges and fix them early.
- Reinforce thin spots before they tear. Patching worn fabric early prevents bigger holes.
- Avoid unnecessary stress. Try not to overstuff pockets or wear jeans that are too tight in high-friction areas.
- Rotate your jeans. Giving each pair a rest reduces wear.
Know When to Retire Them
If the denim around the repair keeps tearing, the fabric may be too worn to save. At that point, you can turn the jeans into shorts, a bag, or a source of patch fabric for your next repair.
Frequently Asked Questions
Can I patch jeans without sewing?
Yes, with iron-on patches, though they usually last longer with added stitching.
What thread is best?
Heavy-duty, upholstery, or denim thread is strongest. Use embroidery floss for decorative work.
Do I need a sewing machine?
No. Hand sewing works well, though a machine speeds up long repairs.
Can I patch stretch jeans?
Yes. Use a stretchy patch and flexible stitching.
How do I fix a crotch blowout?
Use a large interior patch with several rows of stitching that extend well beyond the damage.
How long will a patch last?
A well-stitched interior patch can last for years, depending on wear.
Conclusion
Patching jeans at home is a simple skill that pays off again and again. With a sturdy patch, strong thread, and a little patience, you can turn a torn pair into one that lasts for years.
Remember the key points: assess the damage, cut a patch larger than the hole, anchor your stitches in strong fabric, and choose thread that can handle denim. If you prefer an invisible fix or a bold visible repair, the process stays the same.
Don’t be afraid to experiment. Every patch teaches you something new, and even imperfect repairs give your favorite jeans a story.
Give this method a try and share how your repair turned out in the comments. Subscribe for more practical mending and DIY guides.

I am James Patterson an American writer sharing thoughtful insights on dreams, spirituality, personal growth, and everyday life through practical guides and meaningful stories for SpiritualDreamz.com readers everywhere with warmth.