Introduction
Few houseplants reward a little effort quite like pothos. Hardy, fast-growing, and remarkably forgiving, this trailing vine ranks among the easiest plants to multiply, making it a favorite for beginners and experienced plant owners alike. With just a pair of scissors and a single healthy vine, you can turn one pothos plant into several for free.
Propagation simply means creating new plants from cuttings of an existing one, and pothos roots so readily that many people succeed on their very first try. If you want to fill out a sparse pot, start a new plant for a friend, or rescue a leggy, overgrown vine, propagating pothos takes only a few basic steps.
In this guide, we’ll walk through exactly how pothos propagation works, the different methods you can use, and how to care for your cuttings until they grow into thriving new plants.
What Is Pothos Propagation?
Propagation, at its core, means growing a new plant from a piece of an existing one rather than starting from seed. For pothos, this process centers around a small but essential structure called the node.
A node appears as a small bump or slightly thickened section along the vine, usually where a leaf attaches to the stem. Nodes matter because they contain the plant’s growth cells the same cells responsible for producing both roots and new leaves. Cut a piece of vine that includes at least one node, place it in water or soil, and that node can sprout roots, eventually developing into a fully independent plant.
You’ll often notice small brown or tan nubs near the nodes on a mature pothos vine; these are aerial roots, which the plant naturally grows to help it climb or absorb extra moisture. These aerial roots give propagation an extra head start, since they often develop into the plant’s primary root system once placed in water or soil.
Because pothos roots so reliably from nodes, propagation doesn’t require any special equipment or advanced plant knowledge, just a clean cut in the right spot and a bit of patience.
Why Propagate Pothos?
Propagating pothos offers several practical benefits beyond simply expanding your plant collection.
Free plants rank as the most obvious appeal. Instead of buying new pothos, a single healthy vine can produce multiple new plants at no cost.
Fuller, bushier pots result when you propagate cuttings and replant them back into the original pot’s soil rather than starting a separate container. This technique, sometimes called “chop and prop,” quickly transforms a sparse, leggy plant into a fuller, more attractive one.
Gifting becomes easy and meaningful with pothos cuttings. A rooted cutting in a small pot makes a thoughtful, low-cost gift for friends, family, or coworkers.
Rescuing an overgrown or leggy vine gives new life to a pothos that has grown long, bare stems with leaves clustered only at the ends. Cutting back the vine encourages fuller new growth on the original plant while giving you fresh cuttings to root separately.
Whatever your motivation, pothos propagation offers a low-risk, high-reward way to expand your plant collection.
What You’ll Need
Pothos propagation requires only a few simple supplies, most of which you likely already have on hand.
Sharp scissors or pruning shears make clean cuts that heal faster and reduce the risk of damaging the vine. Dull tools can crush the stem rather than cutting it cleanly, which slows healing and increases the chance of rot.
A container holds your cutting while it develops roots. A simple glass jar or vase works well for water propagation, while a small pot with drainage holes works for direct soil propagation.
Water or soil, depending on your chosen method, provides the medium your cutting roots in. Filtered or room-temperature tap water generally works best for water propagation.
Rooting hormone, while optional, can speed up root development and improve success rates, particularly for soil propagation. Pothos roots easily enough that most people skip this step entirely.
Sanitizing alcohol or a similar disinfectant helps clean your scissors before cutting, reducing the risk of transferring bacteria or fungal spores to the fresh cut.
Step-by-Step: Water Propagation
Water propagation stands as the most popular method for pothos, largely because it lets you watch the roots develop.
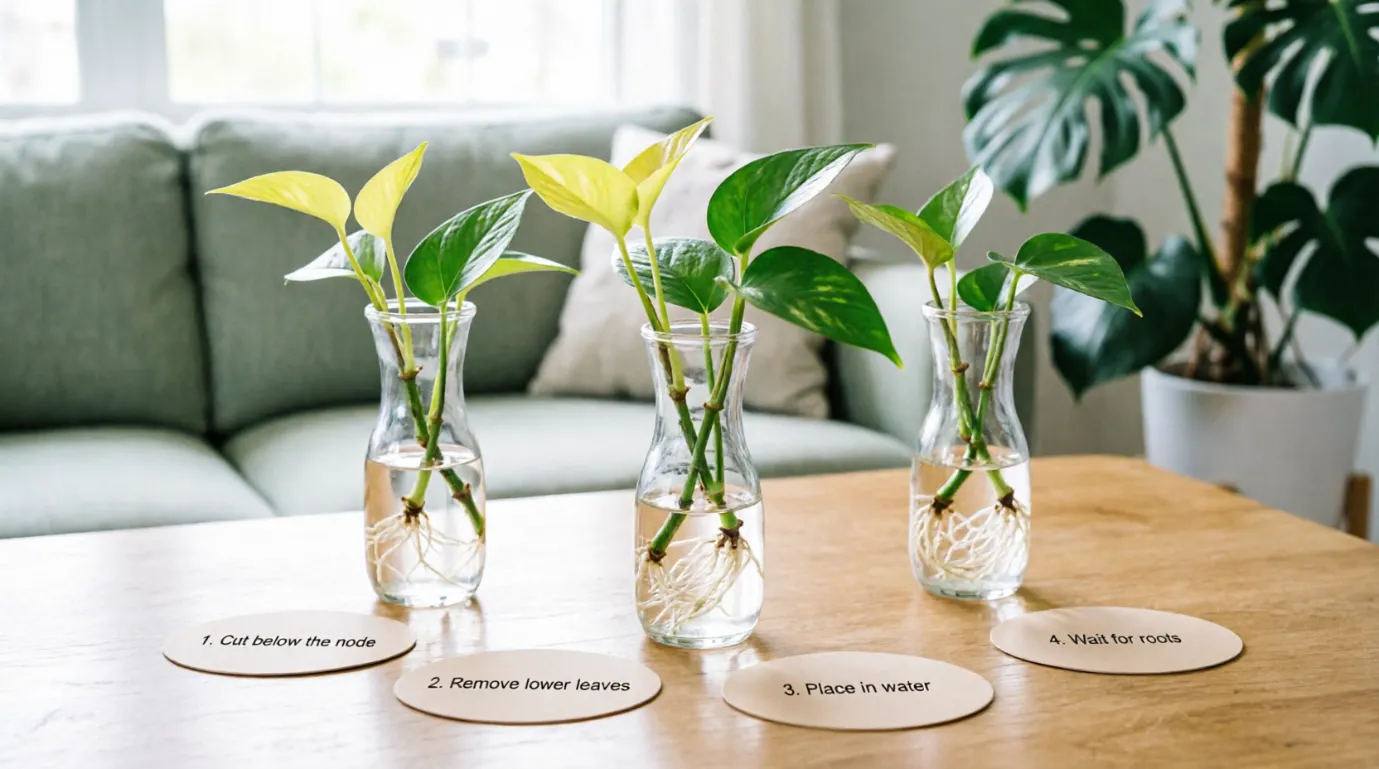
Select a healthy vine with at least four to six leaves, and choose a section that looks vigorous rather than yellowing or damaged.
Cut just below a node, ideally including two or three nodes total in your cutting. Cutting a few centimeters below the lowest node gives the root system more room to develop.
Remove the bottom leaf or two near the cut end. Submerged leaves tend to rot, so leaving only the upper leaves above the waterline keeps your cutting healthier.
Place the cutting in water, making sure at least one node sits fully submerged, since roots grow directly from these points.
Position the container in bright, indirect light. Direct sunlight can overheat the water and stress the cutting, while too little light slows root development.
Change the water every five to seven days to keep it fresh and oxygenated, which helps prevent bacterial growth and rot.
Within two to four weeks, you should notice small white roots emerging from the submerged nodes. Once roots reach one to two inches long, your cutting is ready to move into soil.
Step-by-Step: Soil Propagation
Soil propagation skips the water stage entirely, rooting the cutting directly in its final growing medium.
Take your cutting the same way as with water propagation: a healthy section with at least one or two nodes, cut cleanly just below the lowest node.
Dip the cut end in rooting hormone, if you’re using it, to encourage faster and more reliable root development.
Plant the cutting in moist, well-draining potting mix, burying the node an inch or so beneath the soil surface, since this is where roots will emerge.
Water thoroughly after planting, then keep the soil consistently moist, but not soggy, for the next several weeks while roots establish.
Cover the cutting loosely with a clear plastic bag or place it in a humidity dome, if possible, to maintain the higher humidity that speeds up root development. Remove the covering for a few hours every couple of days to prevent mold.
Check for root development after three to four weeks by gently tugging the cutting. Slight resistance indicates roots have formed and anchored the cutting in place.
Soil propagation typically takes slightly longer than water propagation to show visible progress, but it skips the transplant shock that can occur when moving a water-rooted cutting into soil.
Step-by-Step: Sphagnum Moss Propagation
Sphagnum moss offers a middle ground between water and soil propagation, retaining moisture well while providing plenty of oxygen to developing roots.
Soak sphagnum moss in water until fully hydrated, then squeeze out the excess so it feels damp but not dripping.
Wrap the moss around the node of your cutting, ensuring good contact between the moss and the node itself, since this is where roots will emerge.
Place the wrapped cutting in a small container or bag to help retain humidity, leaving it slightly open for airflow.
Mist or re-dampen the moss every few days, keeping it consistently moist throughout the rooting process.
Check for roots after two to three weeks by gently unwrapping a small section of moss. Once you see healthy white roots an inch or so long, the cutting is ready to plant in soil.
Many experienced growers favor this method for its high success rate and because it produces sturdy, well-developed root systems that adjust to soil more easily than water-grown roots.
Caring for New Cuttings
Whichever propagation method you choose, a few care basics help your cuttings root successfully.
Bright, indirect light supports healthy root development without stressing the cutting. Avoid direct sun, which can scorch leaves or overheat water and soil, and avoid deep shade, which slows growth considerably.
Consistent temperature matters more than most people realize. Pothos roots best in temperatures between 65 and 85°F, so keep cuttings away from cold drafts, air conditioning vents, or heating registers.
Humidity speeds up root development, particularly for soil and moss propagation. A humidity dome, plastic covering, or simply grouping cuttings together can help maintain the moisture cuttings preferred during this stage.
Patience matters just as much as any other factor. Depending on the method and conditions, pothos cuttings can take anywhere from two to six weeks to develop a strong root system, so avoid disturbing them too frequently to check progress.
Transplanting Rooted Cuttings
Once your cuttings have developed a healthy root system, it’s time to move them into their permanent home.
Wait until roots reach one to two inches long before transplanting a water-propagated cutting into soil. Roots that develop in water need time to adjust, so expect some initial droopiness as the plant transitions.
Choose a well-draining potting mix formulated for houseplants, ideally one containing perlite or bark to promote airflow around the roots.
Plant multiple cuttings together in a single pot for a fuller, more established-looking plant right from the start, rather than potting each cutting individually.
Water thoroughly after transplanting, then allow the top inch of soil to dry out before watering again, which encourages roots to grow downward in search of moisture.
Expect a brief adjustment period after transplanting, especially for water-propagated cuttings. Slight wilting or minor leaf drop in the first week or two is normal and typically resolves as the plant adapts to its new growing medium.
Common Mistakes and How to Fix Them
A handful of recurring issues affect pothos propagation, but each one has a simple fix.
Rot at the base of the cutting usually results from submerged leaves or stagnant, un-changed water. Remove any leaves that would sit below the waterline before propagating, and change the water regularly to prevent bacterial buildup.
No root growth after several weeks often traces back to insufficient light or a cutting that doesn’t include a node. Double-check that your cutting includes at least one visible node, and move it to a brighter (but still indirect) location.
Cuttings placed with the node above the waterline or soil surface won’t root, since roots only emerge from submerged or buried nodes. Always confirm the node sits below the surface of your chosen propagation medium.
Yellowing leaves on new cuttings can indicate overwatering, insufficient light, or simply old leaves naturally dying back as the cutting redirects energy toward root growth. A single yellow leaf on an otherwise healthy cutting usually isn’t cause for concern.
Mold on soil-propagated cuttings typically develops from excess humidity without enough airflow. Remove any plastic covering for a few hours daily to let the soil surface dry slightly and improve air circulation.
Ongoing Care for Propagated Pothos
Once your propagated pothos establishes itself, ongoing care remains simple and low-maintenance.
Watering should follow a “soil dry to the touch” rule: water thoroughly, then wait until the top inch or two of soil feels dry before watering again. Overwatering causes far more problems for pothos than underwatering.
Light needs to stay flexible, since pothos tolerates everything from bright indirect light to lower-light conditions, though growth slows noticeably in dimmer spots.
Fertilizing every four to six weeks during the growing season (spring and summer) with a balanced, diluted liquid houseplant fertilizer supports steady growth, though pothos generally grow just fine without regular feeding.
Occasional pruning keeps your pothos looking full and encourages bushier growth, and conveniently provides you with fresh cuttings any time you want to propagate again.
With minimal care, a propagated pothos cutting typically grows into a full, trailing plant within several months, ready to be propagated again whenever you’d like to start the cycle over.
FAQs
How long does it take to propagate photos?
Most cuttings develop visible roots within two to four weeks in water, though soil and moss propagation can take slightly longer to show progress since you can’t see the roots directly.
Can you propagate pothos directly in soil?
Yes, pothos roots successfully in soil without needing to start in water first. Keeping the soil consistently moist and maintaining higher humidity around the cutting improves your success rate with this method.
Why are my pothos cuttings turning yellow?
Occasional yellowing on a lower or older leaf is normal as the cutting redirects energy into root growth. Widespread yellowing, however, usually points to overwatering, insufficient light, or a cutting that’s struggling to root.
Do you need rooting hormone to propagate pothos?
No, pothos roots readily without it, especially in water. Rooting hormone can speed up the process and slightly improve success rates for soil propagation, but it isn’t essential.
Can you propagate pothos from a leaf without a node?
No, a leaf alone, without a node attached, can’t grow roots or develop into a new plant. Every cutting needs at least one node to successfully propagate.
Conclusion
Propagating pothos ranks among the most beginner-friendly ways to expand your houseplant collection, requiring little more than a clean cut, a bit of water or soil, and a few weeks of patience. If you choose water, soil, or sphagnum moss propagation, the same core principle applies: include a healthy node, provide the right conditions, and let the plant do the rest.
From filling out a sparse pot to creating thoughtful gifts for fellow plant lovers, pothos propagation offers an easy, rewarding way to multiply a plant you already love. Once you’ve successfully rooted your first cutting, you’ll likely find yourself propagating again and again pothos makes it nearly impossible not to.

I am James Patterson an American writer sharing thoughtful insights on dreams, spirituality, personal growth, and everyday life through practical guides and meaningful stories for SpiritualDreamz.com readers everywhere with warmth.