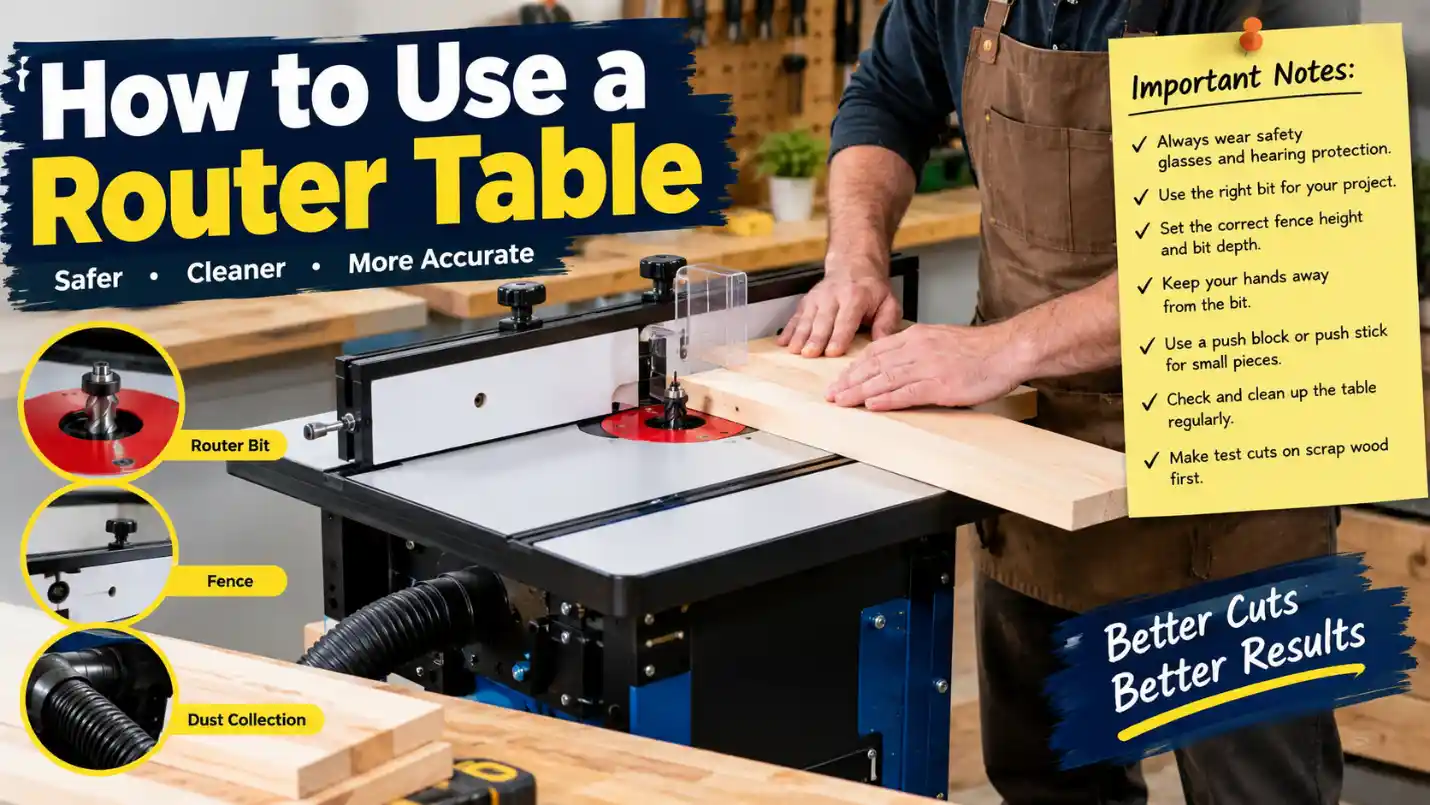
To use a router table, install the correct router bit, adjust its height, and position the fence for your desired cut. Secure the workpiece, wear safety equipment, and turn on the router. Feed the wood against the bit’s rotation, using steady pressure and shallow passes. Always test your settings on scrap wood before cutting your project material.
Key Takeaways
- A router table helps you make accurate edges, grooves, and woodworking joints.
- Always unplug the router before changing bits or making adjustments.
- Set the bit height and fence according to the cut you need.
- Feed the wood against the bit’s rotation to maintain control.
- Use safety equipment and test cuts before working on your final project.
What Is a Router Table?
A router table is a woodworking tool that holds a router upside down beneath a flat tabletop. The router bit extends through an opening in the table, allowing you to move wood across the spinning bit instead of moving the router by hand.
It is useful for making smooth edges, cutting grooves, shaping wood, and creating joints. A router table can also make repeated cuts more consistent because the fence guides the workpiece.
Main Parts of a Router Table
Tabletop: Provides a flat surface that supports the wood while you work.
Fence: Guides the wood and controls how far it moves past the bit.
Router bit: Cuts or shapes the wood. Different bits create different profiles and grooves.
Insert plate: Holds the router beneath the table and provides an opening for the bit.
Understanding these parts makes it easier to set up your router table correctly.
How to Use a Router Table Step by Step
Follow these steps to prepare your router table and make your first cut.
1. Prepare Your Workspace
Start by placing your router table on a stable, level surface. Secure it according to the manufacturer’s instructions so it cannot move during operation.
Clear away unnecessary tools and wood scraps. Check that your workpiece is free from nails, screws, and other objects that could damage the bit.
Wear safety glasses and hearing protection. Use suitable dust collection, and wear respiratory protection when needed. Tie back long hair and avoid loose clothing.
2. Install the Router Bit
Unplug the router before installing or changing a bit. Select a bit designed for the material and the cut you want to make.
Loosen the collet using the correct wrench, insert the bit according to the router manufacturer’s instructions, and tighten it securely. Avoid inserting the bit too far or leaving too little of its shank in the collet.
Check that the bit is properly seated and that it does not wobble. Never install a damaged or unsuitable bit.
3. Adjust the Bit Height
The bit height determines how much of the cutting edge extends above the table.
Use the router’s height adjustment or router lift to set the bit to the required position. For a round-over edge, for example, adjust the bit to create the desired rounded profile.
Start with a shallow cut when possible. If your project requires removing more material, make additional passes rather than forcing the bit to remove too much wood at once.
4. Set the Router Table Fence
The fence guides the workpiece and helps you maintain a consistent cutting depth.
Move the fence toward or away from the bit until the correct amount of material will be removed. Make sure the fence is secure and properly aligned with the bit.
For bits without a guide bearing, the fence is usually essential. Keep the opening around the bit as small as the operation and manufacturer’s instructions allow.
Use suitable guards and featherboards where appropriate to help hold the workpiece securely.
5. Make a Test Cut
Before cutting your actual project material, use a scrap piece of similar wood. Ideally, it should have the same thickness and grain characteristics.
Turn off and unplug the router before making any adjustments. Check the cut depth, fence position, and bit height.
Make a test cut and inspect the result. If the profile or depth is incorrect, adjust the setup and test again.
6. Route the Workpiece
Once the setup is correct, connect the dust collection system and make sure the router is switched off before plugging it in.
Stand in a stable position and hold the workpiece firmly against the table and fence. Start the router and allow it to reach its operating speed before feeding the wood.
Move the workpiece smoothly through the cutter without stopping or forcing it. Maintain control throughout the cut, and use push blocks or other suitable aids when appropriate.
After completing the cut, switch off the router and wait for the bit to stop completely before removing scraps or making adjustments.
Which Direction Should You Feed Wood?
When using a conventional router table with the fence positioned between you and the router, feed the wood from right to left. This direction moves the workpiece against the rotation of the bit and helps keep it against the fence.
Feeding in the wrong direction can cause the bit to grab the wood, resulting in loss of control or dangerous kickback.
For bearing-guided operations without a fence, the correct technique depends on the setup. Follow the bit manufacturer’s instructions and use an appropriate starting pin and guard where required.
What Can You Make With a Router Table?
A router table is useful for many woodworking projects. The type of bit you install determines the cut you can make.
| Router bit | Common use |
| Round-over bit | Creates smooth, rounded edges |
| Chamfer bit | Makes angled edges |
| Straight bit | Cuts grooves and dados |
| Rabbeting bit | Creates recessed edges for joints |
| Flush-trim bit | Trims wood to match a template |
| Raised-panel bit | Shapes panels for cabinet doors |
For example, you can use a round-over bit to soften the edges of a wooden shelf. A straight bit can create a groove for a cabinet back or drawer bottom.
Always check that your router has the power and speed rating required for the bit you plan to use.
Router Table Safety Tips
Router tables use fast-spinning cutting bits, so safe operation is essential.
- Disconnect the power: Unplug the router before changing bits, adjusting the setup, or performing maintenance.
- Use protective equipment: Wear safety glasses and hearing protection. Use suitable respiratory protection when dust exposure requires it.
- Keep the guard in place: Use the bit guard and other safety accessories supplied for your operation.
- Avoid loose clothing: Keep your hands, hair, and clothing away from the spinning bit.
- Use shallow passes: Avoid removing too much material in one pass.
- Keep the workpiece stable: Use suitable featherboards, push blocks, or jigs to improve control.
- Never force the wood: Feed it smoothly and maintain a firm grip.
- Wait for the bit to stop: Never reach near a moving cutter.
Read your router and router table manuals before use. If you are new to the tool, learn the basic operations under the supervision of an experienced woodworker.
Common Router Table Mistakes to Avoid
Beginners can improve their results by avoiding a few common mistakes.
Taking too much material in one pass: A deep cut can strain the router, damage the wood, and increase the risk of kickback. Use multiple passes when appropriate.
Using the wrong feed direction: Feeding with the bit’s rotation can cause the router to pull the workpiece out of your hands. Always check the correct direction before starting.
Skipping test cuts: Incorrect bit height or fence settings can ruin your project. Test the setup on scrap wood first.
Using an unsuitable bit: Make sure the bit is designed for the operation and is compatible with your router.
Ignoring workpiece support: Long or narrow pieces can be difficult to control. Use suitable support and safety accessories for the job.
Frequently Asked Questions
How do beginners use a router table?
Beginners should start with a simple edge profile using a suitable bit. Secure the router, install the bit with the power disconnected, adjust the fence and bit height, and make a test cut on scrap wood. Practice feeding the material smoothly before working on a finished project.
Can you use a router table without a fence?
Yes, some operations can be performed without a fence, particularly when using bearing-guided bits. However, you need an appropriate setup, such as a starting pin and suitable guarding, where required. Never attempt freehand routing without understanding the specific technique and its risks.
How deep should a router table cut be?
There is no single cutting depth for every job. It depends on the router, bit, wood, and operation. Start with a shallow cut and make additional passes if needed. Follow the bit manufacturer’s recommendations and avoid overloading the router.
Is a router table safe for beginners?
A router table can be used by beginners who understand its controls and follow proper safety procedures. However, the exposed spinning bit can cause serious injuries. Beginners should start with simple cuts, use the correct safety accessories, and seek hands-on instruction when possible.
Final Thoughts
Learning how to use a router table starts with understanding its parts, choosing the right bit, and setting the fence and bit height correctly. Make test cuts, feed the wood against the bit’s rotation, and use appropriate safety equipment.
With careful setup and practice, you can use a router table to create smooth edges, accurate grooves, and consistent woodworking joints for a wide range of projects.

I am Toni Morrison an acclaimed American novelist and Nobel Prize winner whose powerful storytelling explored identity, memory, love, heritage, and the human spirit through unforgettable literary works at Spiritualdreamz.com.